The way to Use a Golf Cart for Yard Work

Golf carts can effect a laborious task like gardening much easier because you can use the cart to lug gardening equipment, plants and tools back and forth. While garden carts and wheelbarrows make transporting substances much simpler, you must still exert the power to lift, thrust and balance the cart or wheelbarrow. A golf cart works best for gardening if you’ve got a freight area or rear seating row. Golf carts are much more compact compared to trucks, allowing you to move around your property without damaging the terrain.

Stack bagged mulch, gravel, compost or potting soil in the rear of the golf cart and use the cart to lug the bags to the desired location. In case you’ve got a compost pile, you can bend a plastic bin to the golf cart and use the bin to take bulk compost.

Toss weeds into the rear of the golf cart as you tend your flower beds if you’ve got a cargo area rather than rear seating. When the cart is full, you can transport the weeds to some compost pile or trash can.

Strap 5-gallon buckets to the rear seats with elastic cords or nylon straps. Fill the buckets with gravel, manure or garden refuse and transport them across the lawn.

Rake leaves or grass clippings on a tarp. Tie the tarp to the golf cart with soft twine and tow the leaves or grass throughout the yard or to a compost pile.

Secure a string to small fallen trees and protected the other end to your sturdy bar or tow hitch, if available. Slowly drive forward in the golf cart to pull on the tree where needed. You can use the exact same strategy to transfer tiny stumps and stones, but you must cease if you notice any strain on the golf cart.

Install a trailer hitch to the rear of the golf cart, using a trailer hitch assembly kit that comprises the hitch, receiver hitch, pins and all necessary mounting hardware. Together with the trailer hitch installed, you can attach a small utility trailer to the golf cart so you can haul more material at one time. It also cuts down on rugged wear so you don’t hurt the golf cart.

See related

Landscaping With Mexican Black Pebbles

Mexican beach pebbles, naturally overshadowed from the ocean to smooth, circular shapes, come in numerous sizes and colours. The black variety is particularly striking and adds an exotic touch to this landscape. Use these attractive pebbles for visual attract accent walkways, containers, water features or inside a xeriscape garden design.

Artistic Designs

Black Mexican beach pebbles will create any coloured blossom or planting container pop and then turn it into a stunning statement, whether it’s black pebbles in a white basin, dark pebbles surrounding red blooms, or used in a simple Zen garden. For a more permanent attribute, embed black pebbles in mortar to create a decorative mosaic, alternating the seams with coloured stones or marbles. You can also create a little patio using the pebble-and-mortar technique.

Mulch Alternative

Pebbles create a synthetic mulch that cuts down on the need for weed killers, and including a layer of vinyl under will help keep grass from poking through. Pebble mulches can also be fire-resistant, don’t harbor diseases or insects and don’t soften the soil of nitrogen and other nutrients. Add a layer of dark pebbles as mulch around base plants to make an interesting distinction between the dark stones and the exterior wall color of your house.

Walkways

Pebbles are an inexpensive, easy, low-maintenance pick for gravel paths that receive light to medium foot traffic. Additionally, using the dark pebbles to lay a path around trees means you wo not have to disturb the roots. Offset the dark hues of this Mexican beach pebbles by placing them between a boundary of white flagstones, red brick or stone pavers.

Water Features

Water enhances the sleek and smooth surface of Mexican black pebbles, including a sparkling touch to garden ponds, waterfalls or fountains. In dry areas of your yard, recreate the ripples and flowing waters of a stream by laying out changing shapes and sizes of pebbles in curved patterns that mimic currents and eddies. These dry riverbeds will appear like the actual thing each time it rains.

Xeriscaping

Xeriscaping is a water-efficient technique employed in landscaping and can be particularly beneficial in desert areas or in a backyard garden where you would like to recreate a desert layout. Use Mexican black pebbles as a foundation and include cacti, succulents and other drought-tolerant plants to reduce the need for watering. Because the black surface of the pebbles means they will absorb and retain heat, only add them around plants that could tolerate the higher temperatures.

See related

How to Design a Moss Dish Garden

Bringing moss into your home using a dish garden can add a gorgeous natural indoor feature. With minimal preparation and attention, your dish garden can thrive with lush greenery. Moss is a visually interesting plant that does not flower or have roots. In favorable conditions, it can form a mounding green mat. While homeowners can become frustrated by outside mosses competing with turf at the lawn, this hardy plant can be welcomed inside in a container because of the little maintenance needed.

Decide on a dish or terrarium of any size without drainage holes or using a saucer underneath. Put about three inches of potting soil in the dish.

Gather moss outside using a hand shovel to dig the plant up alongside a small quantity soil where it is growing or purchase moss from a nursery or online; collect enough moss to cover the whole soil surface of your dish garden. Search for various kinds of moss to enhance the visual appeal. Collect objects such as small stones, sticks, and small accent plants to have in your dish garden.

Spray the soil of the dish garden with water so it is thoroughly moist. If you’d like to get a mounded impact immediately, build up the soil in 1 place of the dish garden so it is slightly higher than the remainder of the garden.

Press down firmly on the soil throughout the dish garden, as moss grows on firm surfaces and this will prevent soil from washing out from under the moss.

Firmly press one section of moss into the soil at a time, piecing the borders of the sections together until the whole soil surface is covered. Incorporate any extra elements, such as rocks, sticks, or other plants, in the dish garden in this time.

Spray the top of the moss with water once it is all implanted and put your dish garden at the desired place; moss typically prefers shade.

Water your moss dish garden frequently for the first three weeks after it is implanted ensuring the plants don’t become dry.

See related

How to Identify Weeds in St. Augustine Grass

St. Augustine grass (Stenotaphrum secundatum [Walter] Kuntze) is a warm-season grass that grows in U.S. Department of Agriculture plant hardiness zones 8 through 10. It has high tolerance for heat, shade and drought along with a low tolerance for cold weather. The grass blades are 4 to 10 millimeters wide and folded down the center, with leaves opposite each other at the leaf nodes. Maintain St. Augustine grass weed-free by obeying the proper irrigation and fertilization schedule for your lawn. The amounts of each will be different based on the soil type and the number of rainfall you have.

Look carefully at the grass stems. St. Augustine grass stems have rolled leaves in the stem, while invasive sedges like green kyllinga (Kyllinga brevifolia) and nutsedge (Cyperus spp.) have triangular-shaped stems.

Examine the leaves. Broadleaf weeds are easily differentiated from grass leaves. White clover (Trifolium repens) and creeping woodsorrel (Oxalis corniculata) have rounded clusters of leaves and grow in patches near the ground. Plantains (Plantago major) have elongated, oval-shaped leaves which grow from a base. Spurge (Euphorbia maculata) has multiple tiny leaves on long, spreading stems. Dandelions (Taraxacum officinale) have sharp leaves with pointed edges and fuzz. English daisies (Bellis perennis) have succulent-like leaves. Grass weeds can be more difficult to distinguish. Goosegrass (Eleusine indica) is dark green with a silvery leaf base. Like groosegrass, crabgrass (Digitaria spp.) Grows in tufts but is also a lighter green without a silvery shade.

Use the dirt condition to help identify the most likely weeds. Annual and perennial grasses grow in St. Augustine grass that’s over-watered, grown in compacted dirt or mowed too brief. Annual and perennial broadleaves invade grass that’s nitrogen-deficient or contains thin patches in the lawn. Sedges like areas with poor drainage and frequently show up in hot, sunny weather.

See related

Remodeling Ideas for Backyards

Backyards can be sanctuaries or constant reminders of a to-do list. Remodeling the inside of a house may take precedence over repairing the backyard, but once attended , a beautiful and user-friendly backyard adds value to your home and offers a sanctuary from the world outside. Making a simple sketch of this outside area helps to organize a garden that works. Include existing shrubs and trees and indicate areas that need screening for privacy, in addition to areas that get full sun or full shade.

Patios and Decks

Old, cracked, concrete patios are eyesores and can be safety hazards. Breaking up concrete patios is noisy and can be pricey, but the piled broken pieces make rustic and attractive non retaining walls. Newly poured concrete patios can be a fantastic solution for mid-century-style modern gardens, however flagstone placed in brick or concrete patios add more warmth and texture to a room. Crushed-gravel patios work well where water runoff is an issue –the permeable surface allows water to percolate through, instead of slide surfaces. A deck made from wood or composite materials can immediately extend the living area of a house. Ideally, a deck may have easy access in the kitchen, making impromptu alfresco meals a likelihood.

Water Features

The noise of water at a backyard can be soothing, but also paying for water functions may not inspire Zen-like thoughts. Natural-looking rock waterfalls that fall a few feet into shallow pools, designed and installed by professionals, can be pricey. Homeowners can opt to install a cast-stone fountain, though, using a recirculating pump to conduct it. Licensed electricians can hardwire the electric motor, or homeowners can select a solar-panel-operated version. Long cords that extend from the solar panel to the pump allow the fountain to sit at a shady corner and also the solar panel to occupy a glowing patch.

Lighting

Adding backyard light isn’t inexpensive, but it can add safety in addition to attractiveness to a backyard. Professionals need to install high-definition lights to code. Low-voltage or solar-powered lights are good projects for do-it-yourself enthusiasts. Choose large trees and install lights that shine up into the canopy from the base of this tree. Adding lights under the railings of decks, or along the risers of almost any measure leading up to them, makes night dining safer and more appealing.

Lawns and Plants

Installing new sod, or reseeding tired or worn-out yards, is relatively inexpensive and offers young children with safe places to playwith. A concrete strip installed around yard areas helps remove the need for constant edging around the turf. Before ripping out any existing plants, analyze which ones thrive in their existing site. Mature landscaping can be worked around, and it can’t be replaced once ruined. Even if a specific plant annoys one member of their household, frequently adding companion plants around it is going to help it fit in the landscape.

See related

Geometry Roots Great Garden Design

Geometry might have been a dull subject at college for some people, but it’s had a significant influence on the design of our houses throughout the ages. The use of geometry for a design tool has taken us on an intriguing journey from the ancient gardens of Persia into the parterres of Renaissance Europe and even to our modern gardens.

The contours in our garden greatly influence the way we view and experience it. We use circles, squares, rectangles and triangles, divided and joined to one another, to mesh to formal design. Geometric shapes delineate boundaries, create spaces and channel views.

Here is a choice of gardens which show clear utilization of geometrics in their design, from simple aerodynamic gardens to knot gardens, two-dimensional gardens and modern three-dimensional landscapes.

www.KarlGercens.com

As rooms require a focus, such as a fireplace or a window, gardens with simple geometric designs also require a point on which the eye may rest. This traditional design comprising a central axis which divides the region has an archway into another garden as its principal focus.

Using a central path with a distant viewpoint is a great way to earn a brief garden look more.

Harold Leidner Landscape Architects

The perfect symmetry of these simple geometric designs allows for the chance to decorate the flat planes created. Renaissance Europe saw the use of parterres and knot gardens where simple — and later more complex — contours were delineated with low-growing citrus plants. Initially, as in this contemporary version of a knot garden, coloured sand was laid between the evergreen “lines”

Watch more about parterre gardens

Deborah Cerbone Associates, Inc..

Later these essentially two-dimensional layouts were “embroidered” with plants, making a richly coloured pattern. This modern take on a knot garden uses a simple mixture of whites and grays to recreate this ordered fashion round the most fundamental of geometric shapes: squares and triangles.

Small knot gardens can be a decorative and practical way to grow culinary customs.

Isler Homes

Perhaps the easiest use of geometry and basic contours in the garden is this very modern take on a French parterre. The general square boundary is bordered with a lineup of trimmed conifers echoing the central squares of evergreen “box” plants. We even have a “viewpoint” in the positioning of the simple, classically designed bench.

Randy Thueme Design Inc. – Landscape Architecture

This very contemporary courtyard garden has its own origins in the past with its officially planted low beds — now using grasses — in a symmetrical design.

Ron Herman Landscape Architect

The easiest two-dimensional design may be the most satisfying. In the 1930s, Dutch designer Mein Ruys was utilizing intriguing new ideas to provide her gardens a framework. She also laid a Mondrian-style grid around the floor to split up the space. She implanted some regions while others bare.

Here we see a contemporary version of this utilizing equal squares of grass, paving and pebbles — an almost maintenance-free design that would be ideal for front garden.

Blakely and Associates Landscape Architects, Inc..

Two-dimensional design is still very important now. The use of form and line here with no plants, generates both curiosity and movement in a satisfying design based on the classical principles of scale and proportion.

Adriana Aristizabal

The evolution of the contemporary three-dimensional design started in the middle of the 20th century when evolution in visual arts propagate throughout architecture and eventually influenced garden design. The use of elevated planted beds and even the positioning and elevation of this chaises seen here show how we have moved on from simple pattern making to making a usable space.

SHKS Architects

The three-dimensional design of this front garden nearly has its own origins in the paintings of this 20th-century artist Mondrian. Its powerful geometric-shape raised beds of varied heights are reinforced by the width of the walls. All is softened, though, by the superbly implemented and understated plantings.

Outer space Landscape Architecture

Modern formal gardens use geometry to define private outdoor spaces, and smaller gardens require clean lines and minimal characteristics to allow for multifunctional uses. Geometrics aid this design. The powerful rectangular shape of this table and seat, for example, reinforce the clean lines.

Blasen Landscape Architecture

Geometry can transform space into a cutting-edge landscape. Here we view the epitome of garden design that is geometric. The combination of lines, right angles and simple shapes functions well, developing a clean, serene and uncluttered appearance.

Ron Herman Landscape Architect

The ultimate display of geometrics is observed here in this checkerboard design by the architect Ron Herman. The inspiration came from moss and rock Zen temple gardens in Kyoto, Japan. The grid design of cubes is surfaced with smooth river pebbles and Helxine (Soleirolia soleirolii), while a vertical accent is offered by slim bamboo.

More:
Keep Your Gardens in Lines

Give Your Small Garden A Few Space

More Ideas for Stylish Outdoor Living

See related

6 Dependable Ground Covers for Warm Climates

Gardening in hot regions includes a whole set of challenges: warm summers, dry shade, heavy rains, droughts and soils ranging from pure sand to impenetrable clay and soggy muck. But believe it or not, there’s certain to be a appropriate ground cover to your garden, no matter how warm, dry, shady or soggy it may be. These ground covers will give your garden a place where the eye may rest, and will give you a little more rest too, thanks to their undemanding nature.

A number of the crops listed here are also grown as shrubs or specimen plants, but they are too helpful to ignore as ground covers. Firecracker plant is often considered a shrub, but its delicate arching stems cover a whole lot of ground without obstructing the view. Cinnamon ginger is a bit on the taller side if you permit it to grow unchecked, but even then it creates a weed-suppressing tall ground cover that seems excellent paired with shorter ground covers like lilyturf.

Speckled Cast Iron Plant
(Aspidistra sichuanensis ‘Ginga’, syn. ‘Milky Way’)

This is a little and speckled relative of cast iron plant (Aspidistra elatior, USDA zones 7b into 11), which is generally grown as a houseplant, but expect to see it branded as Aspidistra ‘Milky Way’ in nurseries. To be entirely honest, any Aspidistra plant will probably do the job very well as a ground cover in the landscape, irrespective of its title. This one just happens to be short enough to be utilized as a lawn substitute, superbly seen and readily available at local nurseries.

The only maintenance you will want to do for cast iron crops is that the occasional removal of dead leaves as they appear and division every couple of years. Not that you really should dig and replant them; they are so amazing and helpful that you’ll look forward to spreading them across the landscape.

Where it will grow: Evergreen in zones 7b into 11; find your zone
Water requirement: Reduced to ordinary; well-drained soil
moderate requirement: Full shade to partial sun
Mature size: 1 foot tall and two feet wide
Seasonal interest: Inconspicuous flowers; evergreen foliage year-round
When to plant: Spring to autumn

Dig Your Garden Landscape Design

Bulbine
(Bulbine frutescens ‘Hallmark’)

It has the drought tolerance of a succulent, the low and mountainous feel of a turfgrass, and spikes of the bright orange flowers of a, well, bulbine. Plant this South African indigenous as a foil for coarser plants, in the edge of flower beds or along paths, where the waving stalks of crimson blooms will bring in honeybees and butterflies. While any bulbine will work wonders for an outside area, the ‘Hallmark’ variety reseeds significantly less and is much easier to find in your nursery.

Bulbine Is drought tolerant and largely maintenance free, however it can benefit from mulching, deadheading and division in spring or autumn. In extremely hot, bright or dry situations, it may need extra irrigation or shade in summer to keep it moving until a rebloom in fall.

Where it will grow: Hardy to 20 degrees Fahrenheit (zones 9 to 11) however resprouts in zone 8
Water requirement: Low; well-drained soil
moderate requirement: Partial to full sunlight
Mature size: 1 foot to two feet tall, eventually forming a two- to 3-foot clump
Seasonal interest: Orange flowers spring and autumn, sometimes in winter and summer
When to plant: Spring to fall

Cinnamon Ginger
(Alpinia nutans)

If your garden is too soggy or too shady for other ground covers, then you will love this plant. Also known as untrue cardamom ginger, cinnamon ginger appears like a dwarf version of the more widely increased shell ginger (Alpinia zerumbet, zones 9 to 11) in each respect. Another noteworthy difference, however, is that the incredible scent of cinnamon you are able to smell upon crushing the leaves or cleaning up from the plant. Use cinnamon ginger for a ground cover or a accent in shade gardens or where you desire a lush and tropical look, no matter how small the space.

Its slow expansion allows you to trim the taller stems back every few years to keep it short, or you may allow it to grow up to 4 feet tall as a tall ground cover, so you will have a chance to witness its rare porcelain flowers.

Where it will grow: Remains evergreen to 25 degrees Fahrenheit (zones 9b into 11) however resprouts in zone 7b into 11
Water requirement: Typical; tolerates standing water and drought once established
moderate requirement: Full shade to partial sun
Mature size: 3 to 4 ft tall and 4 to 5 ft wide
Seasonal interest: White and orange shell-shaped flowers are rare; develop it to the lush foliage.
When to plant: Spring to fall

Carolyn Chadwick

Society Garlic
(Tuhlbaghia violacea)

Edible garlic-flavored purple flowers on a drought-tolerant and grassy ground cover — what other reasons do you want to replace your yard with society garlic? Suffering colonies of this plant are seen in parking medians and hell strips where it’s hardy, but it responds well to routine watering and a occasional increase of fertilizer, and it may fill into form a weed-suppressing ground cover in just a few years.

The big blue and white flowers looming overhead in the photo below will be those of the oft-planted lily of the Nile (Agapanthus africanus, zones 7 to 11). It makes a great companion for society garlic, because both plants bloom at the same time, are from South Africa and thrive in more or less the very same problems. Insert a yellowish bulbine (Bulbine frutescens, zones 9 to 11) into the mix for a much more impressive display.

Where it will grow: Hardy to 20 degrees Fahrenheit (zones 9 to 11) however resprouts in zone 7
Water requirement: Low; well-drained soil
moderate requirement: Partial to full sunlight
Mature size: 1 foot to two feet tall and wide
Seasonal interest: Purple flowers in summer and spring, occasionally in autumn and winter
When to plant: Spring to fall

Lilyturf
(Liriope ‘Evergreen Giant’)

Lilyturf is common in households throughout the world because it gives the eye a place to rest on — much like turf grasses — but without the maintenance. It needs to be trimmed just twice a year, once in summer months before the first flush of new growth, and in autumn to eliminate the stalks of spent purple blooms and ripening berries. It’s not the end of the world if you fail to prune it all, however, and it will continue to form a much sexier deep green mass with each passing year.

Clumping lilyturfs like this one are not considered invasive. While I have not had any difficulties with Liriope spicata, a creeping relative of ‘Evergreen Giant’, it can spread rapidly via runners and is considered invasive by a few. But then again, are turfgrasses like St. Augustine. It should also be mentioned that Liriope is often confused with mondo grass(Ophiopogon, zones 5 to 11), and is an actual grass.

Secret Gardens

Where it will grow: Hardy to 20 degrees Fahrenheit (zones 9 to 11) however resprouts in zone 7
Water requirement: Low
moderate requirement: Partial to full sunlight
Mature size: 1 foot to two feet tall and wide
Seasonal interest: Purple flowers in summer and spring, occasionally in autumn and winter
When to plant: Spring to fall

Noelle Johnson Landscape Consulting

Firecracker Plant
(Russelia equisetiformis)

Firecracker plant is a bit more unkempt than the other ground covers recorded here, but its airy and translucent demeanor keeps it from becoming overly visually obtrusive. It’s excellent for slopes or retaining walls, where its billowing and fragile stems can arch downward into a waterfall of tubular red flowers that hummingbirds can not resist.

It’s drought tolerant enough to be generally planted in the warmer regions of the American Southwest, also besides pruning errant stems, there’s minimal maintenance to worry about, particularly in the event that you plant it a few feet away from paths. The long and wispy stems seem fantastic when planted amongst architectural plants like agave and crinum, and firecracker plant can even be trained from walls and trellises in small spaces.

Where it will grow: Hardy to 20 degrees Fahrenheit (zones 9 to 11), however resprouts in zone 8b
Water requirement: Reduced
moderate requirement: Partial to full sunlight
Mature size: Feathery stems form a mass around 3 ft tall.
Seasonal curiosity: Red tubular flowers spring through autumn, sometimes in winter
When to plant: Spring to fall

See related

Berm

A berm is a mounded or shaped planting feature of a landscape. Berms tend to be curved and are raised from 18 to 24 inches high. They are sometimes placed to add visual interest, to cause proper drainage or to conceal unsightly elements.

Debora carl landscape design

Berms add visual interest and are a handy way to plant species that have similar sunshine and water requirements. There are unlimited design possibilities for a berm.

Jennifer Jamgochian / Multiflora

Berms and island bedrooms are extremely similar, and frequently the terms are used interchangeably. Island beds normally stand alone, nevertheless, whereas a berm can be a more natural part of the landscape. This is a good illustration of an island bed.

LLC, Company & Woodburn Landscape Architecture

Berms can also be described as the strips of lawn with a street, or the flat areas flanking a tube.

Christopher Yates Landscape Architecture

Not all berms have to be flower beds; ornamental grasses planted to a large sloping mound are a modern solution to the berm.

See related

How to Make a Stacked Stone Fire Pit

While trudging through the everyday lifestyle of apartment dwelling, my husband and I spent a lot time dreaming of the day we’d finally own our very first house. We spent a lot of time chatting about what we needed once we had a place we could call our own, and a grill and fire pit were constantly sexy conversations.

So whenever the day we became homeowners arrived, the idea of a fire pit was finally on its way to fruition. But before anything was built, there were a few decisions that had to be made. Details such as location, size, price and variety of rock, together with a little bit of research, were at the very top of my list. While browsing online, I found it very hard to locate just what I was searching for. So in a bid to generate another source, I chose an article about how best to create a fire pit was in order.

Erin Lang Norris

I decided to begin with a photo of the finished project as opposed to a photo of these stuff because it is a bit more interesting than a bunch of tools and materials laid out would be. Additionally, I thought it could possibly be a good idea to provide a general idea of what your attempts can produce if you choose to go this course.

Materials:
Concrete: 5 or 4 luggage
Mortar: 5 or 6 bags
Rebar: 10 pieces (approximately 24 inches )
Sandy creek flagstone and steppers: 1,600 pounds
Fire brick: 50 bricks

Supplies:
security glasses
Hose
Old wheelbarrow
Chisel
Mallet
Shovel
Chemical gloves
Leather gloves
Lots of patience
2 bottles of ibuprofen

Dimensions: 5 ft wide and 18 inches tall, which can be somewhat large, so use these figures loosely depending on how big your yard.

Approximate price: $450

Erin Lang Norris

Before we did anything, we viewed our yard from multiple angles to determine the best place for our fire pit. Next, we measured and marked the area with a can of spray paint at the end of a rope attached to a rod. Think of this as a large-scale drafting compass.

Once the yard was marked, we’d a principle for the foundation, which I shall just come out and say we didn’t dig deep enough wide enough, and we’ll probably need to address the consequences in the future. We dug just about 8 inches down, but I’ve read that it is recommended to go as far as 3 feet deep depending on your winter climate.

Erin Lang Norris

We prepared the concrete and poured it into the excavated area, leaving about half an inch between the top of the ground and the top of the concrete. Once the wet concrete was poured, I pressed about 10 2-foot-long rods of rebar into it for extra strength, then made sure that the cement was flat.

Erin Lang Norris

Although I probably should have let the foundation cure completely, I didn’t really do this. I could not find any good tutorials at the time and kind of only winged a couple of things, which I discovered to be stressful because this was something that I wanted to endure for a long time. I’m hoping that anybody who uses this as a tutorial is going to learn from my errors rather than repeat them.

Once the concrete was poured, I let it thicken a bit. During this time I piled my stones: large ones to a side and horizontal ones to the other. As I did so, I put aside the stones that I favored for the base. I desired varying peaks but wanted to make certain that everything on the bottom row was horizontal. I mostly chose stones which had a slight curve so that I could match it to the ring.

Hint: When you are selecting your gems at the stone yard, it is helpful to pick the flattest ones you can find so you aren’t working with any more angles than you presently have.

Erin Lang Norris

After the bottom row has been put, I let it harden for a few days. Then I started to stack the stones in small segments at a time to learn how they’d fit together. I usually did so before heading to work every day, so I’d do about a third of a degree daily.

After I enjoyed how it seemed, I moved the stones off to the side, being certain to keep everything in precisely the exact same order that I had just created. Ironically, this is the toughest part for me and required a long time. My best advice would be to not get caught up in perfection.

Erin Lang Norris

I combined small batches of gold and applied a coating under each rock as I went along. It is important not to get ahead of yourself here and just mix as much mortar as you can manage in a short period of time.

Hint: If you’re like me and do not have a stretch of days to do so all at the same time, your yard can take a serious beating. You may choose to stage everything in one specific area so you don’t have too much bud to repair.

Erin Lang Norris

Among the more difficult parts of this project came as I neared the top degree. Not only was I trying to fit things together side by side, which explains why a chisel is practical, but that I was now working against the grain of my own”varying peaks” thought. Sure, it may look cool, but it is most definitely a struggle to get things much again toward the very top. By now the job had turned into a vertical puzzle in addition to a flat one. This is where having various thicknesses of rock helped a lot.

The photo shown here was my last degree before placing the cap stones. I set the fire and mortared it collectively. While building the flame pit I left a few small openings for ventilation, I took into consideration when placing the fire . I ended up using three narrow gaps for airflow when all was said and done. If I were to do it on, I would not do this. It was among those tips that I kept reading over and over, but with a fire pit this size, I do not really require extra airflow.

Erin Lang Norris

Now, it is almost finished! My husband and my brother filled the floor with pea gravel after I dug the bud out from the middle.

I guess now is a good time to mention that getting to this stage required a large amount of strength, and my biceps became kind of huge. If this freaks you out, be careful. Transferring 1,600 pounds of rock all around the place by hand gets a bit grueling at times, especially when you’re working at ground level. This is where the ibuprofen was useful.

Erin Lang Norris

I saved my flattest and largest stones for the top, although I did need to make a second or third trip to my rock provider to get exactly what I wanted. A couple of hours afterwards, it was finally finish! Here you can see how difficult this endeavor was on the bud, but in my case it was really helpful because I finally removed it made that job easier.

Hint: When you purchase your stone, it is a good idea to buy more than you think you’ll want so that you’ll have a good selection to choose from.

Erin Lang Norris

I anxiously built my very first fire while hosting a party of approximately 30 people. It was only at that stage that I realized that I would need to scale into the flame pit to construct fires. I didn’t really realize how enormous it was before this particular day. We still get a kick from it.

Hint: For us, a large fire pit fits in well with the size of the yard. When you’re in your planning stages, maintain the size of your yard in mind so that it does not look too large or too small.

Erin Lang Norris

After a couple of parties, I started round two of the procedure: landscaping the surrounding area. I used the spray paint and series method for this component, too. I dug down about 3 inches and set landscaping fabric on top. We’re fortunate to live in an area with rich black dirt, but be cautioned that this would be a necessity to do by hand if you have clay or stone. May I suggest that you locate some friends and turn it into a”celebration”?

Hint: Be certain you have someplace to put all of the dirt that you will dig if you go this path, as it yields far more than you could think.

Erin Lang Norris

Next we laid pea gravel and called it quits for the period. Fall was here and the days were becoming cooler. I was happy to get this completed before winter set in.

We’d eventually like to substitute the pea gravel using something more bizarre, but this is exactly what was in our funding at the time. I read a whole lot about the nuisances of pea gravel — which it gets on your home and sneakers all of the time and that it is hard to keep clean.

I haven’t found this to be an issue, but again, the home is far enough from this area that it does not get tracked indoors, I wear only sandals in summer time, and a leaf blower will go a long way when removing debris from the fall.

Erin Lang Norris

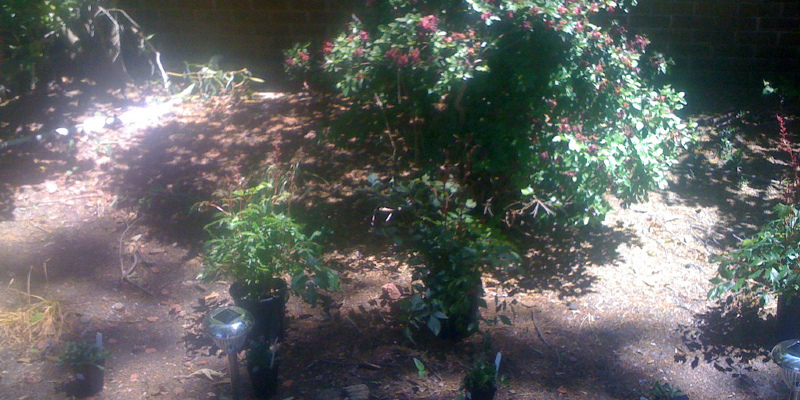
After a massive garden overhaul this spring, I eventually had a few spare days to revisit this project. We dug out much more bud, laid mulch and started planting flowers. Off to the side, a large wooden planter can be utilized for branches, and a log pile is at an arm’s reach.

Finally I need this space to be more intimate and enclosed. I’m going to plant a few shrubs and some wildflowers in varying hues of purple, orange, red and yellow to maintain this area warm and inviting. We will also contain the gravel a bit more with a perimeter of sandstone.

Erin Lang Norris

This is exactly what it looks like from our deck. As you can see, I used the additional stones to create a route that leads to the area. Next year I shall plant blanket flowers at the edge of the path. But for this season, I’m contemplating it done.

For today I believe I’ll kick back and listen to late-night tales told by friends together with the crackling sound of fire in the backdrop.

More:
Browse fire pit layout ideas
More DIY jobs

See related

3 Fuss-Free Tactics to Garden

Have you been looking at same bare piece of backyard dirt for the last calendar year? Hey, we have all been there. You say you are too busy, acknowledge you are idle, argue you don’t have enough space, or perhaps believe you are just terrible in gardening. Mother Nature has heard every excuse in the book, and that woman has some brilliant fixes her up for the shameful thumbs amongst us. With a little elbow grease, it’s fairly straightforward to make a gorgeous garden that will not need much (if any) care.

First things first though: Get rid of this notion that there’s a kind gardening which doesn’t need function. Regardless of what, you are going to have to set at least a small effort in. It is inevitable with gardening — and a part of that which makes the final outcome so sweet. If you do it right, and do your own research, you are going to wind up saving money and time on outside maintenance and attention.

Debora carl landscape layout

1. Try xeriscaping. A fancy term for low-water landscaping, xeriscaping is about utilizing plants that can withstand exceptionally dry (or drought) conditions. Even in the event that you don’t reside in the desert, a well-planned xeriscape can save you a significant chunk of change and time in regards to keeping your garden. Obviously, succulents are a natural and obvious choice for this. There are hundreds of types, they’re beautiful, easy to plant, and even easier to look after. This vertical garden brightly equipped with succulents provides an unexpected splash of green in an otherwise crude outdoor area.

Debora carl landscape layout

Succulents are also great since you can permit them to grow wild. Most varieties will not need much pruning or maintenance. These plants seldom look unkept — even if spilling out of planters or on sidewalks, they look cultivated and purposeful.

Motionspace Architecture + Design

As much as all of us adore the idealized American fantasy of a kelly-green lawn, grass is hard to keep and costly to water, fertilize, and aerate. If investing that much into your front yard sounds terrible, consider clearing the distance and creating a rock garden. This is a superb way to fill out an outside space, and if you plant strong perennials, you won’t have to do much but enjoy their beauty.

Frank & Grossman Landscape Contractors, Inc..

If you’re looking for a bit more green, moss or clover can be a great bud alternative. Both grow fairly quickly but don’t have to be mowed. They are insect-resistant, don’t require fertilizer, and seldom require water. Honestly, as soon as you know that, why do you choose bud?

Randy Thueme Design Inc. – Landscape Architecture

Flagstone pavers are used here as a type of ground cover around an outdoor firepit. For a splash of color, the landscape architect planted a gorgeous perennial creeping thyme between a number of the stones.

Garrett Churchill Inc..

If you are stuck on the idea of having a plant which requires a lot of water, creating a small pond or bog could save a lot of watering time (and money) in the long term. Be sure to only do this for plants that really require a lot of moisture, otherwise the moist area might actually overwater and kill them.

Arterra Landscape Architects

2. Go for the natural appearance. The less it’s supposed to look groomed means less maintenance for you. As always, you need to look for plants which are less difficult to maintain naturally, in that they need little soil, fertilization, watering, or even a specific kind of exposure. Try not to select something which’s going to grow or spread quickly. Many all-natural grasses need little pruning and attention. Look for non invasive types suited to your climate.

Milieu Design

If you are looking to add blooms to your backyard, flowers like Black-eyed Susans and Jupiter’s Beard grow nicely without a lot of work. Avoid taller vegetables and flowers, because their thick blossoms and fruit frequently need caging and wiring to get support. You might avoid delphiniums or hollyhocks, as an example. While they’re absolutely gorgeous, they can require continuous protection, rich soil and staking.

The Garden Consultants, Inc..

A self-sustaining meadow is the greatest natural and low-maintenance garden. Before going mad with wild grasses and flowers, plant a thick ground cover. This tends to work especially well in weedy places, because it prevents weed growth. But be sure to initiate the ground cover in weed-free soil first, otherwise the plant will have to compete while it’s adjusting to its new house. In the late autumn, after the flowers and blossoms have disperse their seeds, the meadow can usually be mowed down entirely, enabling it to return throughout the following year. Don’t forget to compost!

Summerset Gardens/Joe Weuste

Ground cover may take shape in many forms, including flowers, shrubs, and creepers. Fuss-free options consist of wild ginger, creeping junipers, ground cover roses– and — such as in the photograph above — daylilies and white astilbe. Look closely at exposure for these before planting. Just because they’re easy to raise and maintain doesn’t indicate it’s a free-for-all.

ModernBackyard

3. Plant a container garden. Although grasses are much easier to maintain, in the event that you truly want flowers to brighten up your backyard, perennials are a safe bet. Although annuals do often do well in container gardens, they have to be replanted every year. Container gardens are great because they allow for a whole lot of versatility. You can mix various types of plants collectively (provided that they have the exact same water and sun needs) and avoid the issues that arrive with poor soil. Here a mix of herbs produce a rich palette of texture and color.

All these wooden plant boxes have a variety of dwarf shrubs along with other neighboring plants. Not only are those plants fairly durable, but their slow growth rate means you will rarely have to do any trimming.

Shades Of Green Landscape Architecture

In case you’ve got the space, raised garden beds are just another kind of container garden which may bypass the irritating poor-soil problem that plagues many novice gardeners. Building a raised bed can be far easier than mulching your entire backyard or digging through packaged clay.

Randy Thueme Design Inc. – Landscape Architecture

Stone raised beds are a good substitute for traditional wooden-framed raised beds. The levels save a small distance, while still letting you grow a variety of plants, exactly like a standard container garden. A timed irrigation method might easily be set up in this region, completely eliminating any need for watering by hand.

Next, visit two fun container options for small spaces.

Walter

Wallter Outdoor Planters – $72

Obviously, the best thing about a container garden is you truly don’t require much space at all to bring a little bit of green. There are several choices for displaying container plants, including containers hung from a fence…

A+R

Railing/Balcony Planter Product Detail – $28

… or onto a balcony rail. Modern garden shops have learned to cater to the budding gardener, therefore there are a lot of creative container options out there.

Next: Sudden Edible Gardens
Browse more garden and outdoor products

See related