How to Pick a Dining Room Set

There are several factors to consider when selecting new dining room collection. The first two factors are the size of the dining room area and the budget you have to work with. The first two factors will play a large part in determining the previous 2 — size and quality of the new dining room collection.

Dining Room Dimensions

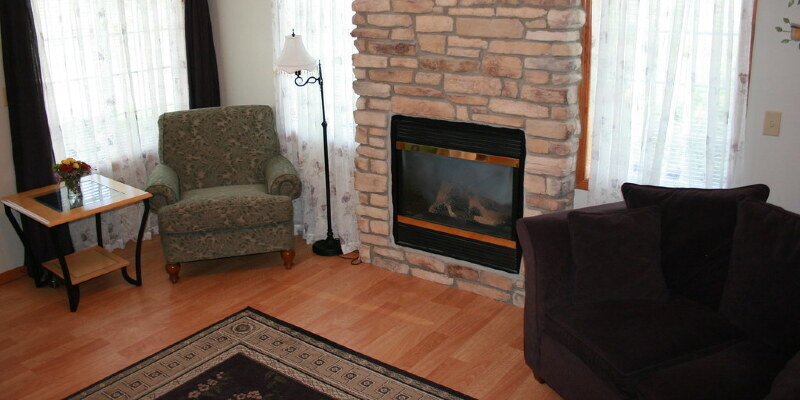
The first element to consider when purchasing a new dining set is what size will fit in your dining area. The dining room table ought to be large enough to accommodate you and your guests and allow enough room to maneuver across the table. When you are ready to start shopping for your new furniture, then keep the measurements of the dining room “width and span” along with a tape measure handy. This will allow you to measure possible dining room sets, hutches and china cabinets to evaluate them with your dining room size and arrangement options.

Table Dimensions

To determine what size of dining area set to buy, several factors can help you make a choice — first is the size of the dining area and the other is the size of the immediate family. If there are five members in your family, don’t buy a dining set which only seats four. In addition, you might want to purchase a dining room set large enough to accommodate guests for supper parties.

Quality and Price

The cost of getting a new dining room set is dependent upon several factors: the craftsmanship put to the furniture, the kinds of substances used to make it and the size. Handcrafted or ornate dining rooms require more man-hours to fabricate. This results in higher production costs, which are passed on to you. The kinds of substances used to construct the dining room set also factor in the final costs paid by the consumer. As an example, a solid oak, cherry or maple wood dining set is significantly more costly than dining room sets utilizing particle board with veneer overlays. The size of the dining room set is the last factor when makers determine a price range for your own furniture. Naturally, a larger set is more expensive compared to their smaller counterparts because they require more labor and materials to fabricate.

Current Founder

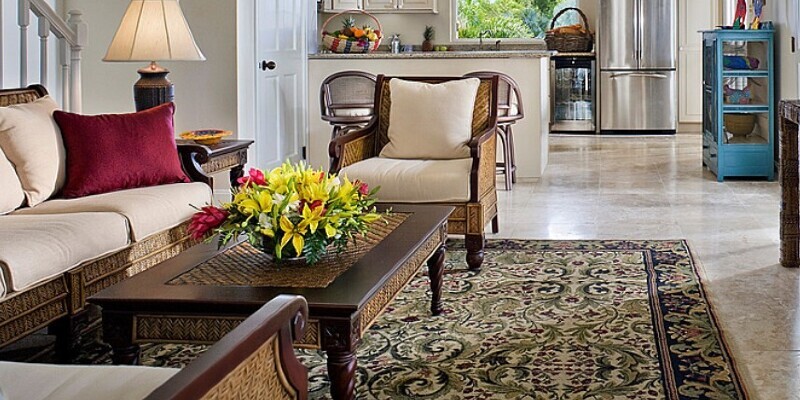
The last element to consider when shopping for a dining room set is the way that it will blend with your current decor. As an example, you would rather not buy a modern contemporary dining set and incorporate it with ancient American living room furniture. Since most American homes incorporate an open floor plan in which the kitchen, living room and dining area are visible, the furniture should flow together. This isn’t to say you cannot use a Victorian dining room set with modern living room furniture; people have different preferences. It’s just not the standard.

See related

Mounting Ceiling Fans on a Sloped Ceiling

Most ceiling fan kits are designed for mounting to your braced junction box on a level ceiling. Fortunately, some companies sell modification kits for mounting ceiling fans on a sloped ceiling. The mounting bracket in the junction box for these instances is usually a ball-and-socket-style swivel mount, allowing the fan to be set up on anywhere from a flat to a 12/12 pitched (45-degree) ceiling. The fan will also need to be fitted using a downrod to provide the blades clearance so they don’t strike the ceiling.

Switch off the breaker to the electrical circuit to the junction box and then switch to which the fan is going to be connected. Eliminate the filter area covering the switch using a screwdriver, and place the tip of a noncontact electrical ripped contrary to the wires around the side of the switch. If the light in the tester turns on, then there’s power in the circuit. Turn off more breakers or the main move to the home and recheck until the tester verifies that the power is off. Reinstall the switch plate.

Expand a stepladder and get rid of the fixture on the junction box in the ground if one is set. Then loosen the screws holding the junction box to the ceiling and then pull the box out of the hole. When there’s no supporting brace in the ceiling capable of holding a ceiling fan, position a fan brace between the joists over the hole, and tighten the brace with an adjustable canopy. Insert the electrical cable to the cable clamp, then place the junction box mounting bracket above the brace and then mount the box by tightening the two locking nuts to the brace using a 1/4-inch nut driver. Tighten the screw on the cable clamp to hold the electrical cable set up.

Eliminate the outer sheathing of the electrical cable using a utility knife, then strip 1/2-inch of insulating material in the ends of the electrical wires in the box.

Install the ball from a ceiling fan threaded bracket to the end of a downrod of the correct length to your ceiling’s toss and blade width (see Resources). Insert the end of the downrod through the ceiling fan’s canopy, then insert the wires in the ceiling fan through the downrod and secure the downrod to the fan engine. Slide the downrod pin through the mounting hole and then secure the downrod pin with a cotter pin. Then tighten the setscrews and locknuts to hold the downrod to the fan engine.

Mount the hanger bracket to the junction box using the fan brace screws. Then lift the fan engine and downrod to the junction box, and slide the ball of this downrod to the socket of this hanger bracket.

Connect the white wire from the ceiling fan to the white cable from the junction box using a wire nut. When there’s a red cable present in the junction box, connect it to the blue wire in the ceiling fan. When there’s no red wire in the junction box, twist the black and blue ceiling fan wires together, then connect the 2 to the black wire in the junction box using a wire nut. Lastly, connect the green wire of this ceiling fan to the bare wire from the junction box. Gently tuck the wires to the junction box over the bracket.

Slide up the canopy the downrod and attach it to the mounting bracket using the four screws included with the fan.

Attach each fan blade to your knife bracket using three blade mounting screws, then attach each blade to the fan motor using two motor mount screws.

Attach the light kit to the base of the lover, if one was included. Connect the blue wire from the fan to the black wire of this light kit using a wire nut, then connect the wires in comparable fashion. Tighten the mounting screws to secure the light kit to the fan before installing the globes and light bulbs.

Turn on the circuit breaker and then analyze the ceiling fan using the light switch.

See related

Mortgage Tax Rules

The IRS allows homeowners to deduct some of the expenses related to purchasing a mortgage. How much you can deduct will be dependent on your personal circumstances, such as income level and marital status, and the loan size and final prices of the loan. Knowing the IRS rules on mortgage tax deductions, can help you maximize the tax savings your home supplies.

Mortgage Interest Tax Deduction

The IRS allows you to declare all mortgage payments as long you submit a Form 1040 and itemize the deductions on Schedule A. If you have a 30-year, $150,000 mortgage with a 6.5 percent interest rate, for instance, you will pay over $41,300 in interest payments throughout the life of the loan, which you can deduct from the income tax.

Mortgage Factors

A mortgage point is prepaid interest borrowers pay to reduce their mortgage interest rate. Each point costs 1 percent of the amount of the loan and reduces your interest rate by anywhere from 1/8 to 1/4 point. You may either declare some of the points paid annually over the life of the mortgage (the normal method), or declare that the entire price of mortgage points from the year you paid them. To calculate the part of factors deductible for any specific year, divide the entire cost by the term, in years, of your mortgage. If you pay $4,000 in points on a 10-year mortgage, you also can deduct $400 annually. For the IRS to permit you to declare the entire price of points in 1 year, you need to meet nine prerequisites detailed in IRS Topic 504 (see Resources). As an example, the IRS requires the payment of points to become an established banking practice in your area, and the mortgage must be secured by your main residence.

The Mortgage Forgiveness Debt Relief Act and Debt Cancellation

When a lender forecloses on your mortgage, the foreclosure sale price of your house might not cover what you owe. Your lender may forgive the equilibrium, however the IRS views canceled debt because of taxable income. The Mortgage Forgiveness Debt Relief Act allows you to exclude canceled or forgiven debt from the income tax. To qualify for this relief, the overall canceled debt shouldn’t exceed $2 million, the house must be your main house, and the reason behind foreclosure must be a fall in your house’s value or personal financial difficulties.

See related

How Do I Find Out Real Taxes by Address?

Your county assessor maintains a record of real-estate records for all parcels in the county. Obtaining the database is free and open to anybody. It includes lot and building size, sales history, and appraised and assessed values. The county appraiser determines the appraised value. The appraised value is a percent of appraised value and is utilized to determine property taxes. Parcels are recorded by Parcel Identification Number, Assessor’s Identification Number or speech. You can get a property’s worth through an online search or a visit to your assessor’s office.

Contact the county tax assessor’s office to the county in which the land is situated. Assessors provide advice online, by telephone and in person.

Enter the property address in the appropriate search box if you are searching online. Provide the identifying information regarding the clerk if you are requesting information by telephone or in person, and request the appraised and assessed values.

Ask a realtor to get a list of sold properties very similar to yours in age, size and condition to ascertain the fair market value of your premises. Fair market value is the price your house would bring in an open-market transaction. Fair market value is usually higher than the county assessor’s appraised value.

See related

What Are the Costs of a House Appraisal?

A home evaluation, an objective opinion about what a home is worth, provides information regarding real estate. Both buyers and sellers seek this information, which can be used mortgage lenders and by tax assessors. Appraisers, though, fee for their services, and the charges may vary. Understanding what the costs of a home evaluation are will help to get ready for one. It offers a little insight into precisely what appraisers are currently searching for when a home is appraised by them.

Preappraisal Prices

Its appraised value can be impacted by a home’s condition. Therefore homeowners seek to do major or minor repairs before an appraisal. These renovations and repairs come with some cost effective. By way of instance, a homeowner might choose to set up new windows to increase the home’s appraisal value or might need to pay someone to fix a leaky roof. Such costs shouldn’t be dismissed. After all, they are normal.

Appraisal Costs

The actual cost of a home appraisal is dependent mostly upon a home’s magnitude and the degree of the appraisal. The evaluation speed is between $300 and $700 in 2010. Appraisers, though charge more valuable and more for larger homes homes. Appraisals which do not require the appraiser to go within the home are costly, but they are less common. Most assessments require complete inspections of a home. Extra for expenses also charges. One Los Angeles firm, A1 Los Angeles Home Appraisal, costs $75 to $150 for travel costs for some assessments. $50 costs $100 more for FHA tests, which require a longer report and when an evaluation is required by clients within two days of a review.

Comparative Market Evaluation Costs

A comparative market analysis, or CMA, isn’t actually a part of an assessment, but a lot of buyers and sellers consider them in similar fashion. This is only because they may be used to pinpoint the cost of a home. The CMA is usually conducted by Realtors. They compare the home to similar homes in the exact same area that have been on the market. Realtors usually do not charge extra for this service, but the price tag is wrapped into the fees that real estate brokers command for their overall performance throughout the selling procedure.

See related

Guest Groups: Drum Up Bohemian Chic Style

I’m in California this week, which seems like the ideal time to think about bohemian-chic decor. Infused with a little rustic, a little Spanish colonial, Moroccan, French and lots of colorful fabrics, like suzanis and paisley prints, boho-chic decor is ideal for a house with a relaxed atmosphere. Think of it as channeling Kathryn Ireland. — Gabrielle from Savvy Home

Les Indiennes

La Reine Fabric, Madder Red

Les Indiennes is one of my ultimate favorite cloth resources for delicate boho-chic paisleys in soft colors. Utilize their fabric for curtains, pillows or even lampshades.

Jayson Home

Antique Candlesticks – $195

Antique candlesticks look great on their own, but their full capacity comes to life at night when they are all lit up and give your room a soft glow.

Furbish

Blue Sea Kantha Quilt – $85

This blue kantha quilt is hand-blocked and -dyed in the traditional Indian fashion and can be used in a wide variety of means.

Layla Grayce

Currey & Company Iron Flourish Wall Sconce Place – $431

These hand-crafted Currey & Company curved wrought iron sconces are ideal for gently illuminating a hallway or foyer.

Shoppe By Amber Interiors

Peter Dunham Fig Leaf Drape Tool – $725

Peter Dunham’s Leaf Fig cloth is quintessential Californian boho chic.

Jayson Home

Antique Carved Mirror-Top Table – $5,995

Antiques lend themselves particularly well to the boho-chic decor, especially those from the dark wood and turned legs assortment.

Jayson Home

Vintage Tulu Rug – $1,950

Just as classic furniture is fantastic in a boho-chic surroundings, so are vintage rugs. Handwoven kilims and Moroccan Berber carpets are my favorites.

Wisteria

Moroccan Stool, Poppy Red – $149

To bring the much-needed Moroccan flair into a boho-chic surroundings, this cute side table is a clear option. Plus, it comes in a wide variety of pretty colors to fit any decor.

Wisteria

Morocco Pillow, Rose – $79

This flavour and lotion pillow is lace on soft cotton and has a Moroccan flair that cries bohemian chic.

Furbish

Pair of Suzani Bolsters – $210

Perfect for rear support on a glider or to get flanking the ends of a daybed, a bright suzani print bolster would be an enjoyable addition to some boho room.

Layla Grayce

Arteriors Tennyson Natural Linen Stool – $720

Not only is that the Arteriors Tennyson linen stool handy for propping your feet up and using as additional seats, but it also blends with virtually every surroundings.

Furbish

Brown Leather Pouf – $285

A tan leather duvet feces has everything to fit the bohemian decor. It’s casual and a tiny vintage, and it could be moved around and used as needed.

Barclay Butera Interiors

Taylor Wing Chair

Boho chic tends to be full of prints or vibrant colors and layouts, so it’s not a terrible concept to counterbalance them with strong cream-colored furniture, like this slipcovered Barclay Butera chair.

Jayson Home

Vintage Suzani, Large – $795

At the foot of a bed or used as a throw in wintertime, a suzani is flexible and stylish. It can even make for great wall art.

Wisteria

Suzani Wastebasket – $79

If you can not afford a vintage suzani, why don’t you get a wastebasket with a suzani pattern?

Wisteria

Farthingale Chair – $429

Some believe the Farthingale chair the first made for comfort. It was developed from the late 16th century, but it could still look fantastic and modern today in a vibrant and relaxed decor.

Furbish

Gray Ikat Chair – $1,500

This modern ikat cloth is very boho chic. In a more modern decor, this midcentury chair would work wonders. Californian decor just so happens to have a penchant for midcentury decor.

Seret & Sons

Headboard & Bench, Black Uzbek Suzani

A suzani headboard and matching bench is pretty much self explanatory from the boho-chic section. If you’re game, it can add a very wonderful impact to your bedroom.

Rejuvenation

Whitewashed Woven Rattan Stool – $228

Rattan is one of these materials that’s quintessentially boho chic. This stool comes in a super hot form and can be used for virtually anything from sitting to keeping beverages.

Next: 8 Bohemian Bedrooms Trek Effortlessly Into Style

See related

Guest Picks: Neutral Upholstered Beds and Headboards

I really like the twin upholstered headboards in my guest room. Now I am on a hunt for just the right upholstered mattress and/or headboard for my bedroom also. The feel of fabric on a headboard is so comfy that I wish to experience it nightly. I am keeping the mattress itself neutral and adding color and pattern in particulars like pillows and throws. Listed below are a number of upholstered beds and headboards which are turning my mind right now. — Donna from A Perfect Gray

Scroll Headboard – $499

I enjoy this tall Scroll headboard with a French feel. It’s simply plain enough to be elegant but not overdone.

Wisteria

Upholstered Queen Headboard – $799

The French styling of this headboard has my heart. The limed wood gives it this elegant feel.

Neiman Marcus

‘Savoy’ Headboard – $699

The profoundly sloped corners on this headboard by Bernhardt make it stand out.

Ballard Designs

Mara Bed With Antique Brass Nailheads – $799

The clean and crisp angles in this bed give this kind of modern appearance. A couple of antique side tables would be heavenly foils for it. And needless to say, I really like the nailhead trim.

Ballard Designs

Squire Headboard Slipcover, Greek Key – $149

I enjoy the Greek key trim on this headboard. I think that it would look snappy on a couple of twin beds, as well as on a king or queen.

Amazon

Skyline Furniture Tufted Wingback Headboard – $481.80

Here is a tufted and winged headboard, and with nailhead trim to boot. Selecting between a tufted or a flat front is going to be challenging.

West Elm

Wingback Nailhead Headboard – $499

Here’s just another winged headboard, but this one has a more aerodynamic, modern feel. I think that it would feel so comfy.

Ballard Designs

Lehigh Upholstered Bed With Antique Brass Nailheads – $799

The wavy lines keep this mattress fresh. The wooden legs are a excellent warm touch.

Pottery Barn

Georgetown Tufted Headboard – $799

Here is a fine, classic headboard with button tufting and a profound channel edge. It’s substantial but not too fussy.

Neiman Marcus

‘Bristol’ Tufted Headboard – $3,499

I am throwing in an over-the-top headboard just for fun. It’s a upholstered linen headboard using antiqued mirror trim. This can be girly and glam all the way.

Restoration Hardware

Vienne Headboard With Metal Bed Frame – $1,195

I am lusting after this French-style headboard with a rustic wood frame along with an upholstered linen insert. I am liking the mix of wood and upholstery increasingly more.

Restoration Hardware

Wallace Upholstered Headboard – $1,095

I enjoy this clean and neat square shape without any nailheads. Sometimes simple is best.

Overstock.com

Safavieh Connie Beige Full/ Queen Headboard – $265.99

Here is a classic camelback shape in a neutral linen with nailhead trim. You can not go wrong with a choice like this.

Bernhardt

Landon Metal King Poster Bed

This is a really distinctive mattress from Bernhardt. It’s a metal poster bed with an upholstered headboard.

Century Furniture

Century Signature King Headboard

I enjoy the ornate design on this headboard. It’s a true standout and would work equally well in a bedroom using traditional or modern decor.

Z Gallerie

Grace Headboard, Parchment Ivory Shantung – $499

I enjoy the fanciful high arch on this headboard from Z Gallerie. I enjoy the notion of a small height on the headboard.

Bellacor

Velvet White Full/Queen Nail Button Notched Headboard – $467

This headboard has a great shape and nailhead trim, also it’s upholstered in velvet — a big plus!

Bellacor

Slipcover Twin Headboard, Ranger Twill Natural – $354

I enjoy this simple slipcovered headboard. It’s great to have the ability to clean and remove if you want to.

IKEA

Bekkestua Headboard, Light Gray – AUD 250

Ikea’s light grey upholstered headboard with button tufting comes in a great price.

HSNi

Nate Berkus Velvet Wrap Upholstered Headboard – $449.95

Folks, this might just be it. It’s just enough of a wing to feel comfy, as well as a somewhat masculine vibe.

Following: 12 Ways to Turn a Bedroom Into Your Own Sanctuary

See related

The way to Install a Bath Light & Fan

Bath exhaust fans vent to the exterior of the building to get rid of excessive heat and moisture from your restroom through showers and hot tubs. A number of these exhaust fixtures incorporate a light kit which could be operated in the identical light switch or separate wall switches. Replacing an existing bathroom lighting with a light and fan kit to be controlled by separate switches would necessitate running new wiring to the switch box, however a port and light kit operating off the same single switch won’t require extra wiring or a change of the switch.

Switch off the circuit breaker that controls the power to the light switch in the restroom. Then loosen the mounting screws and remove the switch plate with a screwdriver. Position the suggestion of a non-contact electrical tester against the wires on the side of the switch. If the lighting on the tester comes on, turn off other breakers or the main breaker to the home until the lighting no further illuminates when testing the wires. Replace the switch cap.

Rank a stepladder beneath the present lighting fixture. Climb the ladder and get rid of the planet and light bulbs in the fixture. Then loosen the mounting screws and disconnect the fixture in the wiring in the junction box.

Loosen the wire clamp inside the junction box, and take out the junction box in the hole in the ceiling. Push the wiring through the hole and to the attic space above.

Remove the plastic grille in addition to the light and fan assembly in the fan housing. Then access the attic over the restroom and find the hole in the ceiling vacated from the junction box. Position the fan housing over the junction box hole between the ceiling joists and mark the outline of the housing onto the drywall with a pencil. Cut out the hole along the pencil lines with a keyhole saw. Position the fan housing so that the bottom border of the housing is flush with the bottom of the drywall, and attach the braces to the corresponding ceiling joists with 1 1/2-inch wood screws using a power drill. Slip the electrical wiring you removed from the lighting fixture through the hole in the access panel of the fan housing.

Find the nearest exterior wall where you would like the wall cap to be mounted for the port. Drill a pilot hole in the middle of the desired place with a 1/4-inch drill bit.

Move outside and position a extension ladder so that it is possible to get the 1/4-inch pilot hole against the side of the home. Put in a 4-inch hole saw to your power drill, and drill a 4-inch hole during the siding and sheathing.

Apply a bead of exterior caulk around the mounting flange of a 4-inch wall cap, then insert the wall cap’s duct to the hole in the wall, and mount the cap to the wall using 1 1/2-inch stainless steel screws.

Return to the attic and also connect a part of 4-inch flexible duct between the duct to the inside of the port cap along with the duct on the exhaust fan. Secure the joints with duct tape.

Return to the bathroom and also tighten the wiring clamp around the electric wires from inside the access panel of the fan housing. Connect the black wire from the electric switch to the black wire in the access panel with a wire nut, then link the wires in similar fashion. Wrap the end of the bare wire around the green grounding screw in the housing and tighten the screw with a screwdriver. Slide the wires to the access panel, and place the panel cover over the panel.

Slip the fan and lighting assembly to the housing, and link the electric plug to the socket to the access panel. Then tighten the mounting screws to fasten the fan and lighting to the housing.

Install one of the light lights in the preceding fixture to the lighting fixture of the fan. Rank the plastic grill over the housing and sprinkle the mounting wires into their slots before pushing the grill against the housing.

Turn the circuit breaker and test the operation of the fan and lighting.

See related

How to Fix the Door Frame Behind the Lock

The side of a door frame in which the lock participates is called the “attack side” of the frame. The attack plunger passes a strike plate on the jamb and maintains the door closed, locked or both. The power of a door closing hard repeatedly, or being forced open, can damage the door frame in the area of the strike plate. When this happens, it’s necessary to fix the frame until it gets worse and needs replacing. The job isn’t difficult for the normal do-it-yourself enthusiast.

Preparation

Open the door and then stabilize it with a doorstop. Loosen and remove the screws that hold the attack plate in the surface of the door jamb using a screwdriver. Take the plate off and save the plate and screws.

Cut the bead of caulking in the vertical seam in which the inner border of the door casing meets the outer edge of the jamb using a utility knife. Cut the vertical seam of caulking in the outer border of the casing in which it matches the wall from bottom to surface.

Start at the top of the vertical slice of casing. Insert the tip of a wood chisel in the seam in which the caulking was cut. Tap the grip of the chisel with a hammer to drive the tip completely under the casing. Pry on the handle of the chisel to detach the casing from the jamb and adjoining wall. Repeat the procedure in several places along the border of the casing to remove the piece.

Pull any finish nails left behind in the edge of the jamb or face of the wall using pliers. Pull finish nails from the rear side of the casing to prevent damaging the surface of the slice, with the pliers or claws of the hammer.

Repairing the Door Frame

Inspect the border and face of the door jamb in the area of the strike plate. If the jamb is split, then squeeze wood glue to the crack and nail the border of the jamb using 4d finish nails. Normally, two nails around one inch apart to the outer edge of the jamb will hold a split together while the glue dries.

Remove the doorstop and shut the door. Inspect the gap between the edge of the door and the surface of the jamb in the area of the strike plate. If the gap is over 1/8-inch wide, open the door and stabilize it using the doorstop.

Put in a wood shim from the gap behind the jamb in the area of the strike plate. Tap the finish with a hammer to make a 1/8-inch gap between the surface of the jamb and the border of the door. Secure the shim in place using a 6d finish nail throughout the surface of the jamb above and below the area of the strike plate. The nails must be 1 inch from the edge of the jamb to prevent splitting the wood.

Put in a 7/8-inch flat wood piece in a power or cordless drill. Utilize the existing hole for the attack from the jamb for a guide and drill through the wood shim.

Reattach the piece of casing in the face of the door jamb using 4d finish nails in the inner edge from bottom to top of the jamb. Attach the outer border of the casing in the wall with 6d nails in 8-inch intervals from bottom to surface. Set the nails 1/16-inch deep for stitch using a nail set and the hammer.

See related

The Way To Cut Ceramic Tile That's Already Installed

Ceramic tiles are tough, durable coverings for both floors and walls. Installed properly, they could last for decades. Unfortunately, since the tiles are so durable, in case a brand new pipe is being laid or the tiles will need to be removed to achieve a few pipes behind the wall, then it is often simpler to cut them through than it is to remove them. While loose tiles are cut using a tile wet saw, installed tiles need to be cut with hand tools. To create box or square cuts in the tile, or to cut out large pieces of tile, use an angle grinder. To create circular cuts to accommodate pipes, use a hole saw.

Angle Grinder

Mark the tile or tiles which need to be trimmed using a grease pencil. The angle grinder may cut the tiles either on the esophagus or right through the tile; create as precise markings as you can to make sure the minimum amount of cutting will be required.

Put on safety glasses and a dust mask. The angle grinder will kick up plenty of ceramic and cement dust as it cuts. You’ll most likely need to cut all of the way through the backing of this tile as well as the tile itself. This may entail cutting through fiberglass, too, so take precautions against inhaling the dust.

Turn the angle grinder so the blade will satisfy the tile perpendicularly. Turn the grinder and thrust the blade straight down to the tile and its own maintenance. After you have cut through, it is possible to pull the blade back for a short cut, or thrust the sword away from you to continue cutting through the tile for longer cuts. Pull the blade straight up and out and turn off the saw between cuts when switching locations or angles.

Hole Saw

Mark the center of the area that you would like to cut the tile using a grease pencil. Put on eye protection and a dust mask to protect against dust.

Pour cooling oil within the tile where the cut will be created. The hole saw will heat up quickly; the cooling will stop it from heat before it cuts through the tile.

Attach the hole saw little to the drill, and place the tip of the guiding piece against the mark you made on the tile. Twist the back and forth a few times to assist the little begin to bite to the glaze on the tile. Initiate the drill, holding it straight up and down against the tile.

Permit the guiding piece to drill straight to the tile. The outer border of this hole saw will cut around the piece, producing a bigger hole at the tile, suitable for pipes to pass through. The little will hold the saw set up and keep it from wandering as possible cut. Keep on drilling straight down until you cut through the tile and its underlayment.

See related