Houzz Tour: A Cheerful Beach House for Every Season

Seaview, Wash. gets a mean of 82 inches of rain per year, therefore inner designer Garrison Hullinger’s shore house is a pleasant refuge from the all-too-predictable Northwest weather. Using the natural colors of his environment as inspiration, Hullinger played a palette of nature-inspired tones and infused it with splashes of welcome color. “I knew I needed to have soothing colors across the main portion of the home,” Hullinger states. “But I wanted a few color pops that could spur, without feeling overly literal for a shore home.”

This cheerful palette, when combined with unique product that showcases natural substances, helps create a perfect weekend getaway — rain or shine.

Garrison Hullinger Interior Design Inc..

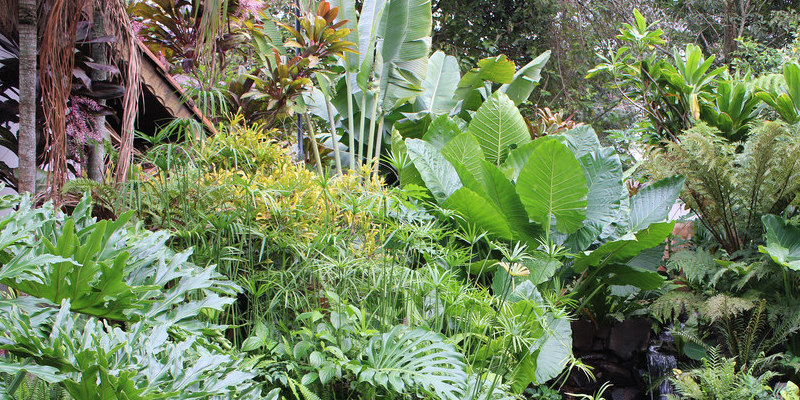
Hullinger and quite substances stuck together in his shore house. Wood grain, natural textiles, and soft colors exist in every room. He left the piled wood back wall in this living space by hand; it is shaped entirely from salvaged materials located on site in the remodel and other projects in the area.

Table: CB2 Teepee Table
Chairs: Eames Molded Plastic Armchair
Side tables: West Elm

Garrison Hullinger Interior Design Inc..

“I think the very first thought someone has as they stroll through the front door is hotel luxe,” Hullinger states. “It is casual. The dark bamboo floor helps ground the area, and hides a multitude of dirt, sand, and hair.”

Console: Wisteria
Lamp: Barbara Cosgrove
Mirror: West Elm

Garrison Hullinger Interior Design Inc..

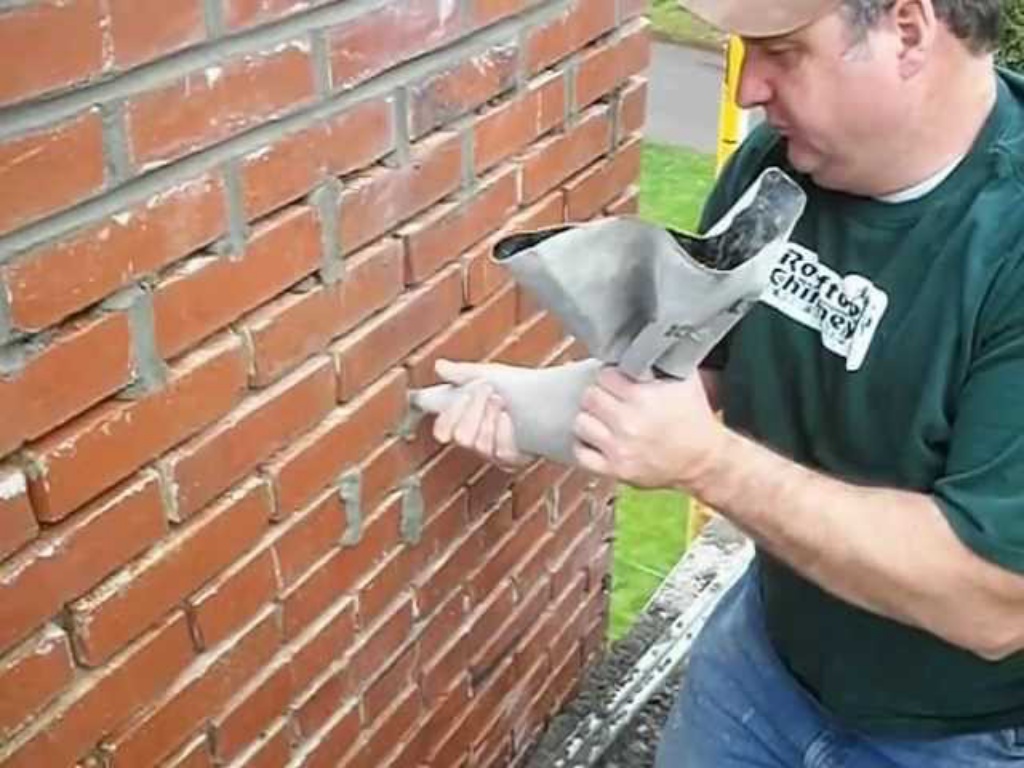
The living room and family room have an extremely neutral palette, which is inspired by colors you’d find collecting seashells and driftwood. Materials in the thick seagrass rug, to the sea blue pillows create a soothing, beachy vibe.

Rug: Overstock.com
Floor lamp: Am-Living
Sectional: custom design by Garrison Hullinger Interior Design

Garrison Hullinger Interior Design Inc..

Hullinger chose a gentle white trim throughout, realizing it would work perfectly with Seaview’s often-cloudy and muted light. “I also kept the furniture backs low in this space, so you can sit anywhere in the space and revel in the expansive views out the windows,” he states.

Lean color: Benjamin Moore’s Winter Wheat
Coffee Table: Oly Studios
Side Table: Wisteria
Tripod Lamp: AM Living Surveyors Lamp
Art: Robin Denevan

Garrison Hullinger Interior Design Inc..

The fireplace is a particular source of gratification. When he bought the home, the fireplace was a old yellow brick with mauve-tinted mortar. He switched all that out for a simple and modern ceramic tile on the bottom half, although the top half is hand-sanded easy plaster.

Tile: NuTravertine by Cronin Tile

Garrison Hullinger Interior Design Inc..

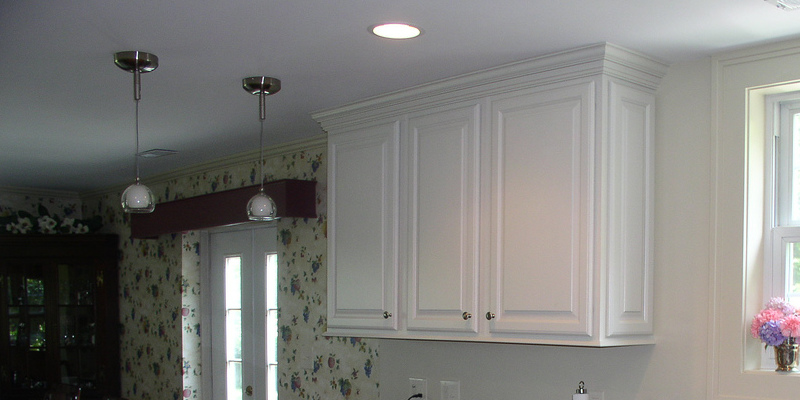
One of the only bright colors in the home is a brilliant turquoise wall that extends out of the dining room into the kitchen.

Interior color: Benjamin Moore’s Juneau Spring
Table: CB2 Darjeeling Dining Table
Barstools: CB2 Contact Stool
Bar: Hudson Goods
Lamp: Barbara Cosgrove
Mirror: Katayma Framing

Garrison Hullinger Interior Design Inc..

Hullinger kept a mix of metallic tones at the home’s fixtures. Bronze and glistening chrome include a luxe feel, but are simple to clean and maintain. “I needed everything to be cozy,” he states, “with substances that could hold around weekend guests and our rescued greyhounds.”

Garrison Hullinger Interior Design Inc..

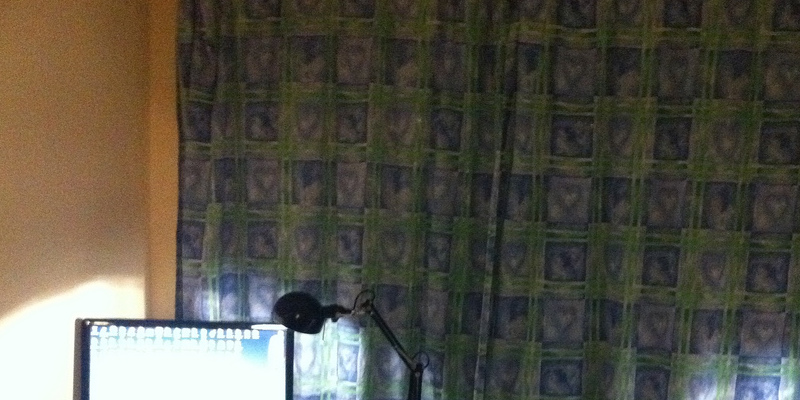
The present cabinetry was sanded down and repainted with a grey paint at a satin finish. White and grey granite blends the cabinetry with all the ceramic backsplash, while classic metal fixtures round out the appearance.

Cabinetry: Painted with Fine Paints of Europe
Flooring: Porcelain tile
Countertop: Madam White Granite

Garrison Hullinger Interior Design Inc..

In the master bedroom, Hullinger exposed a 100-year-old tongue-and-groove plank wood wall, revealing the home’s natural beauty. As a result of this wall’s bold statement, the furniture in the room is kept simple — the bed has no headboard, along with the reddish side tables are clean and minimal.

Table lamps: Kovacs

Garrison Hullinger Interior Design Inc..

A guest bedroom plays from this beachy turquoise wall in the dining room and kitchen. Customized bedding made by Hullinger gives the space a lively feel, while smoky glass table lamps evoke the appearance of foggy sea glass.

Table lamps: West Elm Gourd Table Lamp
Mattress framework: habit by Garrison Hullinger Interior Design
Bedding: custom made

Garrison Hullinger Interior Design Inc..

“It was so much fun designing a distance where I was the true customer,” Hullinger states. “I needed to make sure that the home had all the conveniences of home along with a couple more.” For the floors, ceramic tile made to look like cut — came out of a tile firm.

Floors: NuTravertine by Cronin Tile
Backsplash: Basalt Linear Mosaic by Cronin Tile

Garrison Hullinger Interior Design Inc..

Finely carved basalt tile echoes the appearance of Seaview’s persistently wet weather. “I needed to design a luxurious shower that you wouldn’t wish to step out of,” states Hullinger. Hullinger’s use of soothing color tones and high quality materials generates a really high-end space.

Shower tile: Basalt Autumn Rain Basalt Tile by Cronin Tile

More:
20 Spectacular Beach Houses
Houzz Tour: Coastal Chic Family Getaway
Houzz Tour: Style and Surprise at the Hamptons

See related

Tips for Maintaining Your Gutters

The gutter system on your roof is probably the most important drainage system at home. It drains the water out of the roof and redirects it accordingly. This prevents water logging on the roof and on the property. But Anchorage roofing will not serve with the same efficiency forever. In order to maximize their service, you will need to do a few maintenance tasks.

Here are a few gutter maintenance tips:

Clean Them Up

The biggest challenge with the gutter system is the debris that falls over the roof. Things like leaves and dirt can significantly affect the gutter system and its ability to drain water as required. In order to clean off the debris, find a ladder and a garden hose. Splash the high-pressure water along the roofing companies Anchorage brushing off any dirt and leaves using a small brush. Rinse off the entire system. Ideally, gutter cleaning should be done at least two times a year. Pay attention to mold and mildew too, and don’t forget to inspect and clean up the downspouts. Leaves and lumps of mud are often the biggest culprits for downspouts. Make sure they are all removed.

Gutter Repair

In case your gutter is not moving water as effectively as it should, perhaps something’s wrong. Before you start repairing the gutter system, do a small inspection just to find out where the problem is. First, inspect the spikes. The spikes are designed to hold the gutter in place against the fascia board. If they are loose, the gutter will start to sag. This significantly affects its efficacy in draining water from the roof. Try and tighten the spikes. If they are too old and worn out, replace them with new ones.

You may also want to pay attention to leaks. Gutter leaks can be caused by two simple reasons. First, the gutter could be broken due to years of wear and tear. This is a problem very common with PVC gutter systems. In addition to this, a gutter system might leak water if it’s loose and saggy. Either way, these are all issues that must be fixed as soon as possible.

Finally, make sure you’ve also inspected the rivets on the downspouts. Although downspouts are a very important part of the overall gutter system at home, most homeowners tend to ignore them. The rivets are meant to keep the downspout tightly in place. However, as time goes by, the rivets come off. If this is not addressed, soon the entire downspouts system could fall off, incurring more repair costs. Changing the rivets and tightening the loose ones can help you avoid this situation.

The roofing Anchorage play an important role in drainage. But the gutter system must be in good condition all the time to avoid any potential damages that may arise from flooding.

The simple tips above should help you maintain your gutter system. They will also help you conduct simply DIY repairs when needed.

How to Make a Stacked Stone Fire Pit

While trudging through the everyday lifestyle of apartment dwelling, my husband and I spent a lot time dreaming of the day we’d finally own our very first house. We spent a lot of time chatting about what we needed once we had a place we could call our own, and a grill and fire pit were constantly sexy conversations.

So whenever the day we became homeowners arrived, the idea of a fire pit was finally on its way to fruition. But before anything was built, there were a few decisions that had to be made. Details such as location, size, price and variety of rock, together with a little bit of research, were at the very top of my list. While browsing online, I found it very hard to locate just what I was searching for. So in a bid to generate another source, I chose an article about how best to create a fire pit was in order.

Erin Lang Norris

I decided to begin with a photo of the finished project as opposed to a photo of these stuff because it is a bit more interesting than a bunch of tools and materials laid out would be. Additionally, I thought it could possibly be a good idea to provide a general idea of what your attempts can produce if you choose to go this course.

Materials:
Concrete: 5 or 4 luggage
Mortar: 5 or 6 bags
Rebar: 10 pieces (approximately 24 inches )
Sandy creek flagstone and steppers: 1,600 pounds
Fire brick: 50 bricks

Supplies:
security glasses
Hose
Old wheelbarrow
Chisel
Mallet
Shovel
Chemical gloves
Leather gloves
Lots of patience
2 bottles of ibuprofen

Dimensions: 5 ft wide and 18 inches tall, which can be somewhat large, so use these figures loosely depending on how big your yard.

Approximate price: $450

Erin Lang Norris

Before we did anything, we viewed our yard from multiple angles to determine the best place for our fire pit. Next, we measured and marked the area with a can of spray paint at the end of a rope attached to a rod. Think of this as a large-scale drafting compass.

Once the yard was marked, we’d a principle for the foundation, which I shall just come out and say we didn’t dig deep enough wide enough, and we’ll probably need to address the consequences in the future. We dug just about 8 inches down, but I’ve read that it is recommended to go as far as 3 feet deep depending on your winter climate.

Erin Lang Norris

We prepared the concrete and poured it into the excavated area, leaving about half an inch between the top of the ground and the top of the concrete. Once the wet concrete was poured, I pressed about 10 2-foot-long rods of rebar into it for extra strength, then made sure that the cement was flat.

Erin Lang Norris

Although I probably should have let the foundation cure completely, I didn’t really do this. I could not find any good tutorials at the time and kind of only winged a couple of things, which I discovered to be stressful because this was something that I wanted to endure for a long time. I’m hoping that anybody who uses this as a tutorial is going to learn from my errors rather than repeat them.

Once the concrete was poured, I let it thicken a bit. During this time I piled my stones: large ones to a side and horizontal ones to the other. As I did so, I put aside the stones that I favored for the base. I desired varying peaks but wanted to make certain that everything on the bottom row was horizontal. I mostly chose stones which had a slight curve so that I could match it to the ring.

Hint: When you are selecting your gems at the stone yard, it is helpful to pick the flattest ones you can find so you aren’t working with any more angles than you presently have.

Erin Lang Norris

After the bottom row has been put, I let it harden for a few days. Then I started to stack the stones in small segments at a time to learn how they’d fit together. I usually did so before heading to work every day, so I’d do about a third of a degree daily.

After I enjoyed how it seemed, I moved the stones off to the side, being certain to keep everything in precisely the exact same order that I had just created. Ironically, this is the toughest part for me and required a long time. My best advice would be to not get caught up in perfection.

Erin Lang Norris

I combined small batches of gold and applied a coating under each rock as I went along. It is important not to get ahead of yourself here and just mix as much mortar as you can manage in a short period of time.

Hint: If you’re like me and do not have a stretch of days to do so all at the same time, your yard can take a serious beating. You may choose to stage everything in one specific area so you don’t have too much bud to repair.

Erin Lang Norris

Among the more difficult parts of this project came as I neared the top degree. Not only was I trying to fit things together side by side, which explains why a chisel is practical, but that I was now working against the grain of my own”varying peaks” thought. Sure, it may look cool, but it is most definitely a struggle to get things much again toward the very top. By now the job had turned into a vertical puzzle in addition to a flat one. This is where having various thicknesses of rock helped a lot.

The photo shown here was my last degree before placing the cap stones. I set the fire and mortared it collectively. While building the flame pit I left a few small openings for ventilation, I took into consideration when placing the fire . I ended up using three narrow gaps for airflow when all was said and done. If I were to do it on, I would not do this. It was among those tips that I kept reading over and over, but with a fire pit this size, I do not really require extra airflow.

Erin Lang Norris

Now, it is almost finished! My husband and my brother filled the floor with pea gravel after I dug the bud out from the middle.

I guess now is a good time to mention that getting to this stage required a large amount of strength, and my biceps became kind of huge. If this freaks you out, be careful. Transferring 1,600 pounds of rock all around the place by hand gets a bit grueling at times, especially when you’re working at ground level. This is where the ibuprofen was useful.

Erin Lang Norris

I saved my flattest and largest stones for the top, although I did need to make a second or third trip to my rock provider to get exactly what I wanted. A couple of hours afterwards, it was finally finish! Here you can see how difficult this endeavor was on the bud, but in my case it was really helpful because I finally removed it made that job easier.

Hint: When you purchase your stone, it is a good idea to buy more than you think you’ll want so that you’ll have a good selection to choose from.

Erin Lang Norris

I anxiously built my very first fire while hosting a party of approximately 30 people. It was only at that stage that I realized that I would need to scale into the flame pit to construct fires. I didn’t really realize how enormous it was before this particular day. We still get a kick from it.

Hint: For us, a large fire pit fits in well with the size of the yard. When you’re in your planning stages, maintain the size of your yard in mind so that it does not look too large or too small.

Erin Lang Norris

After a couple of parties, I started round two of the procedure: landscaping the surrounding area. I used the spray paint and series method for this component, too. I dug down about 3 inches and set landscaping fabric on top. We’re fortunate to live in an area with rich black dirt, but be cautioned that this would be a necessity to do by hand if you have clay or stone. May I suggest that you locate some friends and turn it into a”celebration”?

Hint: Be certain you have someplace to put all of the dirt that you will dig if you go this path, as it yields far more than you could think.

Erin Lang Norris

Next we laid pea gravel and called it quits for the period. Fall was here and the days were becoming cooler. I was happy to get this completed before winter set in.

We’d eventually like to substitute the pea gravel using something more bizarre, but this is exactly what was in our funding at the time. I read a whole lot about the nuisances of pea gravel — which it gets on your home and sneakers all of the time and that it is hard to keep clean.

I haven’t found this to be an issue, but again, the home is far enough from this area that it does not get tracked indoors, I wear only sandals in summer time, and a leaf blower will go a long way when removing debris from the fall.

Erin Lang Norris

After a massive garden overhaul this spring, I eventually had a few spare days to revisit this project. We dug out much more bud, laid mulch and started planting flowers. Off to the side, a large wooden planter can be utilized for branches, and a log pile is at an arm’s reach.

Finally I need this space to be more intimate and enclosed. I’m going to plant a few shrubs and some wildflowers in varying hues of purple, orange, red and yellow to maintain this area warm and inviting. We will also contain the gravel a bit more with a perimeter of sandstone.

Erin Lang Norris

This is exactly what it looks like from our deck. As you can see, I used the additional stones to create a route that leads to the area. Next year I shall plant blanket flowers at the edge of the path. But for this season, I’m contemplating it done.

For today I believe I’ll kick back and listen to late-night tales told by friends together with the crackling sound of fire in the backdrop.

More:
Browse fire pit layout ideas
More DIY jobs

See related

How to Repair Chimney Mortar

Repairing a chimney mortar is one of those handyman tasks that you can do yourself. Doing the repair yourself can save you money from having to pay a professional to do the job. The step-by-step process presented below proves how straightforward it is to repair a chimney and build a sloped crown to prevent water leakage in the future.

Tools and Materials

Before you start, it’s important that you prepare the tools and materials that you will need.

Here are some of the most common tools and materials that you’ll need for repairing your chimney mortar:

– Trowel

– Mortar

– Weather cap

Prevent Chimney Leaks

Once you have all the tools and materials ready, you can get started with the job. Start by mixing the mortar until you achieve a consistency that’s similar to that of cookie dough. It shouldn’t be too dry or too soggy.

Here are some tips when it comes to mixing the mortar:

– While the mortar is at rest, prepare the area by clearing all the loose debris away.

– When applying mortar towards the crown, form it within an apex where the peak should be at the middle, sloping down into the edges. Just think of this as something like a roof. The goal is to drain the water far away from the crown.

– Avoid making the edges too thin. It should have a height of about 1/2 to 3/4 inches in order to keep it from detaching at a later time. Then use the mortar to seal any of the holes surrounding the crown.

Leave the mortar for several hours, allowing it to cure before you do any further work on it.

Restore the Brick Joints

Restoring the brick joints is a process that house repairs professionals would call as the tuck-pointing. First prep the area to make sure there’s enough adhesion.

Then apply the mortar directly to the joint with the help of a pointing trowel. You can use your fingers when working on some of the tighter joints. Just make sure that the mortar is packed tightly each time you apply it.

Clear any excess mortar away and make sure the entire void is filled in and they stay well in place.

Make sure that the mortar is churned continuously to ensure proper consistency all throughout the process.

Install a Cap and Screen

In order to finish the project and to keep rainwater from getting into the flue, attach a cap and a screen above the chimney. Depending on the kind of weather cap and damper you have bought, make sure you follow the manufacturer’s instructions when it comes to it.

As you can see, the process of repairing the chimney mortar is easy. However, there are also cases where you might need the help of a professional handyman services to repair the more complicated issues. In this case, don’t hesitate to call for help. It might just save you more money than trying to force yourself into repairing something that you aren’t capable of!

Guest Groups: 20 Cozy Autumn Kitchen Cabinets

With autumn fast approaching, it is time to add deep rich colors and warm cozy textures to your family’s spaces. And what better place to start than at the core of the house, the kitchen? I hope you like my favourite finds for autumn decor. — Lauren from With Two Cats

Etsy

“Bouquet” by Geninne – $30

Every space needs fresh flowers. Can’t afford them? Use this lovely watercolor fragrance by Geninne Zlatkis instead.

Etsy

Rosemary Kitchen Art Print by anek – $38

If your thumb isn’t green enough to grow your own herbs, this publish will continue to keep your kitchen clean and your cooking inspired all year long.

Etsy

Apron Linen Brown by smallbatchproduction – $65

Wrap yourself in warmth with this cozy linen apron. Looks beautiful on or simply hanging from a hook on the pantry door.

Etsy

Go green and bag your grocery store in style with this leather and triangle tote from bookhouathome on Etsy.

Rifle Paper Co..

Hanging Garden Recipe Cards – $12

Record your favourite dishes on these colorful recipe cards out of Rifle Paper Co..

Terrain

Black Hawaiian Sea Salt – $12

Add a dash of the exotic to your cooking with this black Hawaiian sea salt out of Terrain (also it will look pretty hanging out in an open plate, to boot).

Etsy

Natural Lines Tea Towel by PAWLING – $24

Add simple elegance to your kitchen with this handmade, screen-printed linen tea towel.

Jonathan Adler

Bird Salt/Pepper Shakers – $48

These iconic salt and pepper shakers from Jonathan Adler will add a dash of class to your area.

Jonathan Adler

Relief Teapot – $95

This stunning teapot out of Jonathan Adler is sure to add a dose of warm elegance to your evening cup of tea.

Fishpond

“The Fantastic Life” by Adrian Richardson – AUD 57.60

Inspire your culinary creations with this particular artfully-designed cookbook by Adrian Richardson.

truehomeware.com

Enamel Kitchenmanagement Containers

Store your cooking and baking basics in such shiny enamel storage containers. Stackable and beautiful — the ideal blend of form and function.

Anthropologie

Agadir Twists Rug – $498

This richly-colored rug will add just a little warmth and softness underfoot while you brew your morning cup of joe.

West Elm

Sea Measuring Cups – $19

Warm stoneware measuring cups in a vibrant turquoise enable you to get it just right.

Etsy

I adore these hand-carved magnets out of A Second Life on Etsy. If you are going to hang something in your fridge, make it beautiful.

Terrain

Zinc-Topped Country Table – $2,455

This rustic zinc-topped table will provide the ideal work surface for all of your chopping, slicing and dicing.

West Elm

Woven Seagrass Pendant – $89

This organic seagrass pendant is sure to be a show-stopper in any area.

Etsy

Minty Green Metal File Recipe Box by Wannanea – $7

This traditional vintage metal recipe box will keep all of your favourite how-tos at your fingertips.

The Container Store

Maize Bins – $14.99

I really like the colour and feel of these maize bins in The Container Store. A wonderful way to store all those kitchen odds and ends.

childtrek.com

Alphabet Magnets – $69.99

And also to keep your little ones busy from the kitchen these gorgeous wooden letter magnets out of ChildTrek.

Etsy

Hand-drawn Ball Mason Jar by hownowdesign – $10

Mason jars make the ideal storage containers for all things food. Why don’t you make them extra special, like these hand-drawn jars from How Now Design on Etsy?

Next: More guest product picks

See related

Paint Picks: Be Brave Using Black

In fashion, black is a staple color. You need a small black dress, a traditional black suit and a pair of heels and all are considered an absolute must to get a comprehensive wardrobe. However, when it comes to interior design, black is a paint color that lots of shy away from, but it may make a huge impact in your property.

Just like your own wardrobe, the color black can serve many functions in a space. Black can earth a room which has a great deal of color, provide comparison for high impact and make a mood and drama that makes guests and you take notice, much like that little black dress.

Below are a few great ways that you can use black paint into your insides to pack a punch and elevate your space.

Beth Dotolo, ASID, RID, NCIDQ

In this space, the white Murano Glass chandelier has been intended to be the hero. I had this ceiling painted a flat black so that the ceiling would basically evaporate, along with the chandelier could be championed. As opposed to making the space feel closed in, it actually makes the ceiling feel as though it expands infinitely.

Jerry Jacobs Design, Inc..

As opposed to painting the whole room, this space was intended for selective effect. The wall which houses the fireplace has been painted to anchor the room and draw your eye to that focal area of the space permitting the rest of the decor to pop.

Michelle Hinckley

When painted as a all-over color on the walls, either black or a dark shade of grey can make a huge effect. The bedroom revealed here is incredibly dramatic, but not as harsh as you’d anticipate. When you comparison black with lighter colors it aids the space to feel more spacious providing you with the feeling of positive and negative space. A flat paint will also provide you a softer appearance than a paint using sheen.

Dunlap Design Group, LLC

Another great way to use black paint will be on your base and crown molding. Whether this space had white trim it would not be quite as dramatic. The black accent frames the room and anchors the space. It also produces a departure in the builder’s standard finishes and gives your house a customized and tailored appearance.

Jamie Laubhan-Oliver

All these Dallas homeowners painted their kitchen cabinets a high gloss black. I really like that the black paint created a drama in the kitchen giving it an almost fashion forward look.

Jamie Laubhan-Oliver

Another excellent low-commitment way to present black in your space is using a piece of furniture. A couple coats of paint in a high-gloss black paint will breathe new life into any slice.

There are lots of creative ways to present black paint in your space which goes above and beyond just plain black paint. We all know that chalkboard paint is a huge trend these days in interiors. I just love this homeowner selectively painted the toilet door with chalkboard paint. It adds such life to your house because you are able to customize it.

Stonebreaker Builders & Remodelers

Another creative way to utilize black paint is by painting stripes. This hallway feels as though it has been expensively wallpapered, when you can definitely make this look with a little paint, a continuous arm along with some patience. Many home improvement stores sell laser degrees that project a line on your wall to make guides for painting.

Jerry Jacobs Design, Inc..

Below are some practical tips for using black paint:

Tips for painting wall finishes:
When painting walls & ceilings a flat, satin or eggshell paint finish is ideal. Keep in mind that whenever you have textured walls, the more glowing you go the more noticeable the texture, cracks and flaws. Flat has the tendency to be more absorbent which may show fingerprints, but may also give a softer appearance and minimize any defects or cracking your walls may have. To the contrary, you may choose to go to get an eggshell or satin finish to safeguard against absorption which occurs in a moist area like a toilet, like the one shown here.

Tips for painting millwork and furniture:
When painting trim, doors, or furniture, a semi-gloss is a superb option. Semi-gloss paint is easy to wash. Whereas horizontal paint will show fingerprints and glossy paint shows scratches more readily. It is a terrific easy-to-clean finish for high-use areas.

Dark paint is a great addition to any space. It can create drama, set a mood, or just anchor a room or item of furniture. But you chose to use black paint, a sleeker and more stylish space is just a weekend project away.

More:
Style 2011: Black Casework Doors and Cabinetry
Seeing Style in Black & White
What’s Black and White and Chic? Your Home!

See related

Design Details: How to Show Off Your Curves

1 thing I heard from Jennifer Lopez and Kim Kardashian is that curves, when completely embraced, are a fantastic thing. Now you are all like,”Whatchutawkinbout, Willis? Houzz is a decorating and design website, not celeb gossip central.” Well, my point is that curved partitions, while catchy to use, can do good things for a space depending on how they’re addressed. From a cliffside modern to some Malibu Mediterranean, here are some voluptuously vernacular examples of how to operate with curved partitions.

Winn Wittman Architecture

The first thing I think of when I visit architectural features like curved walls is”How the hell do I hang artwork or drapes on a curve?” Costly, custom made hardware is pretty much always going to come into play, but choosing the appropriate draperies is not so tough. Contemplate ripple-fold panels rather than conventional pleats. The overall look is much more tailored and matches beautifully with all the contemporary, unfussy look of floor-to-ceiling glass. Here’s a great illustration from The Shade Store.

On the reverse side, if you have got grand, curvy, floor-to-ceiling exterior glass walls, then it is likely they’re meant to capitalize on a perspective like this house by Fulcrum Structural Engineering. Dressing these windows could have been a crime. Unless the homeowner detests the stunning, multimillion dollar perspective.

Mark English Architects, AIA

How to dress a curved wall with framed bits? Turn the entire thing into a work of art by covering it with something interesting. A concrete look like this may be accomplished with decorative paint and/or skimming the wall with plaster. Or, for decorating a curvy design on a dime, stick together with painters’ tape and a couple of gallons of latex, and also proceed with alternating, arbitrary, vertical stripes.

Mark English Architects, AIA

When it comes to corridors, halls and stairwells, curved walls pose no challenges at all. In reality, they just act as eye candy adorned with nifty, safety-focused hand railings.

Again, the curvy stairwell, another fantastic chance to turn dead space to some focal point; stacked stone is often the best idea since its setup works nicely with curves.

Curves on outside, load-bearing partitions: the perfect situation where everyone wins. Modern architecture lends itself into curvy, conduit-like situations. The glass needs not be addressed window treatments as it is only employed as a means to bridge the gap between the indoors and the outdoors.

If your house’s curve is too extreme to adapt a salon-style gallery, work the area because its large part of artwork. A cost-effective means to do that is using a prefab wall mural. You can find an awesome, uber-affordable world map mural at Amazon.

Tracy Murdock Allied ASID

Here is a good example of how multiple framed bits hung close to one another work nicely in hiding the fact that they’re hiding a curve.

Another alternative: Invest in an artwork hanging system made for curved partitions.

Peregrine Design Build

If you have the dollars, a curved wall constructed can make any displayed object 10 times cooler. The geometry involved is pretty much all precision-based; labour costs can easily rival that of a used sports car.

Superior Woodcraft, Inc..

A curved kitchenarchitecturally astounding. With the right cabinet maker, a curved cabinet-and-counter setup can make the lines of a kitchen as delicious as the food it cooks up.

Next: Browse more house design photos.

See related

3 Fuss-Free Tactics to Garden

Have you been looking at same bare piece of backyard dirt for the last calendar year? Hey, we have all been there. You say you are too busy, acknowledge you are idle, argue you don’t have enough space, or perhaps believe you are just terrible in gardening. Mother Nature has heard every excuse in the book, and that woman has some brilliant fixes her up for the shameful thumbs amongst us. With a little elbow grease, it’s fairly straightforward to make a gorgeous garden that will not need much (if any) care.

First things first though: Get rid of this notion that there’s a kind gardening which doesn’t need function. Regardless of what, you are going to have to set at least a small effort in. It is inevitable with gardening — and a part of that which makes the final outcome so sweet. If you do it right, and do your own research, you are going to wind up saving money and time on outside maintenance and attention.

Debora carl landscape layout

1. Try xeriscaping. A fancy term for low-water landscaping, xeriscaping is about utilizing plants that can withstand exceptionally dry (or drought) conditions. Even in the event that you don’t reside in the desert, a well-planned xeriscape can save you a significant chunk of change and time in regards to keeping your garden. Obviously, succulents are a natural and obvious choice for this. There are hundreds of types, they’re beautiful, easy to plant, and even easier to look after. This vertical garden brightly equipped with succulents provides an unexpected splash of green in an otherwise crude outdoor area.

Debora carl landscape layout

Succulents are also great since you can permit them to grow wild. Most varieties will not need much pruning or maintenance. These plants seldom look unkept — even if spilling out of planters or on sidewalks, they look cultivated and purposeful.

Motionspace Architecture + Design

As much as all of us adore the idealized American fantasy of a kelly-green lawn, grass is hard to keep and costly to water, fertilize, and aerate. If investing that much into your front yard sounds terrible, consider clearing the distance and creating a rock garden. This is a superb way to fill out an outside space, and if you plant strong perennials, you won’t have to do much but enjoy their beauty.

Frank & Grossman Landscape Contractors, Inc..

If you’re looking for a bit more green, moss or clover can be a great bud alternative. Both grow fairly quickly but don’t have to be mowed. They are insect-resistant, don’t require fertilizer, and seldom require water. Honestly, as soon as you know that, why do you choose bud?

Randy Thueme Design Inc. – Landscape Architecture

Flagstone pavers are used here as a type of ground cover around an outdoor firepit. For a splash of color, the landscape architect planted a gorgeous perennial creeping thyme between a number of the stones.

Garrett Churchill Inc..

If you are stuck on the idea of having a plant which requires a lot of water, creating a small pond or bog could save a lot of watering time (and money) in the long term. Be sure to only do this for plants that really require a lot of moisture, otherwise the moist area might actually overwater and kill them.

Arterra Landscape Architects

2. Go for the natural appearance. The less it’s supposed to look groomed means less maintenance for you. As always, you need to look for plants which are less difficult to maintain naturally, in that they need little soil, fertilization, watering, or even a specific kind of exposure. Try not to select something which’s going to grow or spread quickly. Many all-natural grasses need little pruning and attention. Look for non invasive types suited to your climate.

Milieu Design

If you are looking to add blooms to your backyard, flowers like Black-eyed Susans and Jupiter’s Beard grow nicely without a lot of work. Avoid taller vegetables and flowers, because their thick blossoms and fruit frequently need caging and wiring to get support. You might avoid delphiniums or hollyhocks, as an example. While they’re absolutely gorgeous, they can require continuous protection, rich soil and staking.

The Garden Consultants, Inc..

A self-sustaining meadow is the greatest natural and low-maintenance garden. Before going mad with wild grasses and flowers, plant a thick ground cover. This tends to work especially well in weedy places, because it prevents weed growth. But be sure to initiate the ground cover in weed-free soil first, otherwise the plant will have to compete while it’s adjusting to its new house. In the late autumn, after the flowers and blossoms have disperse their seeds, the meadow can usually be mowed down entirely, enabling it to return throughout the following year. Don’t forget to compost!

Summerset Gardens/Joe Weuste

Ground cover may take shape in many forms, including flowers, shrubs, and creepers. Fuss-free options consist of wild ginger, creeping junipers, ground cover roses– and — such as in the photograph above — daylilies and white astilbe. Look closely at exposure for these before planting. Just because they’re easy to raise and maintain doesn’t indicate it’s a free-for-all.

ModernBackyard

3. Plant a container garden. Although grasses are much easier to maintain, in the event that you truly want flowers to brighten up your backyard, perennials are a safe bet. Although annuals do often do well in container gardens, they have to be replanted every year. Container gardens are great because they allow for a whole lot of versatility. You can mix various types of plants collectively (provided that they have the exact same water and sun needs) and avoid the issues that arrive with poor soil. Here a mix of herbs produce a rich palette of texture and color.

All these wooden plant boxes have a variety of dwarf shrubs along with other neighboring plants. Not only are those plants fairly durable, but their slow growth rate means you will rarely have to do any trimming.

Shades Of Green Landscape Architecture

In case you’ve got the space, raised garden beds are just another kind of container garden which may bypass the irritating poor-soil problem that plagues many novice gardeners. Building a raised bed can be far easier than mulching your entire backyard or digging through packaged clay.

Randy Thueme Design Inc. – Landscape Architecture

Stone raised beds are a good substitute for traditional wooden-framed raised beds. The levels save a small distance, while still letting you grow a variety of plants, exactly like a standard container garden. A timed irrigation method might easily be set up in this region, completely eliminating any need for watering by hand.

Next, visit two fun container options for small spaces.

Walter

Wallter Outdoor Planters – $72

Obviously, the best thing about a container garden is you truly don’t require much space at all to bring a little bit of green. There are several choices for displaying container plants, including containers hung from a fence…

A+R

Railing/Balcony Planter Product Detail – $28

… or onto a balcony rail. Modern garden shops have learned to cater to the budding gardener, therefore there are a lot of creative container options out there.

Next: Sudden Edible Gardens
Browse more garden and outdoor products

See related

Dreaming of a Private Waterside Cabana

Summer is in full swing, more so for some than others (I am looking at you, Texas heat that’s keeping us in 100+ degrees and counting)! I don’t know about you but all I could think about is being in water.

You will find plenty of backpacks, springs, lakes and pools throughout Austin, a lot of which I take full benefit. These are all public, mind you (I am on the market for buddies with pools; shout if you want to be my buddy ) but I have no complaints. I want a cabana for personal respites from the undying warmth. You know, like the ones in the beach. Just a tiny hut with some breezy curtains, a mattress, a lover, some umbrella drinks.

Am I asking too much? Perhaps, but I have decided that beach goers don’t have to be the sole lucky cabanistas. With just a little creativity, you can create one — or catch the essence of a single, at least — anywhere. Your pool, backyard, your deck or terrace are all fair game. Dream along with me…

Lori Gilder

This patio may or might not be close to a body of water, however it doesn’t matter; it easily translates into elements for a successful cabana. The natural wood furniture with white cloth feels light and airy, and along with the fan and neighboring plantings, the entire look has a by-the-water feel.

SchappacherWhite Architecture D.P.C.

This comfy daybed tucked between a door and a window just begs to be flopped on for a rest or a fantastic read. The simple color palette (mostly white with neutral and black accents) makes the simple, casual texture a reality; a coating of paint and some toss pillows can transform a room!

Synergy Design Studio

Obviously, adding color never hurts. Take a cue from this arrangement meant for sharing and then invite some friends over! A similar look can be accomplished using a little creative carpentry and covering some high-density foam to create fast, affordable seating. Throw some well-coordinated cushions into the mix and you have got yourself a comfort station which is going to be the talk of your area.

Lori Gilder

Does anything say breezy luxury more than a cabana with a thatched roof? This could be more of a pool house than a genuine cabana, but scaled down, the same idea may be used for a poolside (or yard-side) cabana.

Decorated Shed

Garden Studio, Modern/Cube – GBP 19,995

In case you have a backyard with some spare space, consider turning into a shed-like structure to a miniature beach oasis. Prefab options, for example ones from Decorated Shed, provide a small amount of additional space with a big dose of design. The outside paneling makes this one stand out from the crowd, since it has the potential to coordinate effortlessly with many home designs.

Cabin Fever

Zip Cabin – $13,500

Obviously, there are more affordable options, also. The Zip Cabin can be versatile in its uses and would create a perfectly beautiful cabana on the cheap!

David Ballinger

MetroShed

MetroShed is yet another great option (there’s a cabana-esque picture on their website)! Furnishing these tiny prefab gems doesn’t have to be pricey: A couch, chaise or mattress with cloth suitable for covered outdoor areas, a fan, some romantic lighting for day use, and a tiny refrigerator for frosty drinks ought to do the trick.

Brian Watford Interiors

If your budget permits, I believe that you can not fail with some billowy, sporty drapes.

If you’re feeling flush, ensconce yourself at a dreamy fourposter or canopy bed with sheers that keep the mosquitos out but allow the air flow.

Like I said, none of this has to violate the bank; folding seats are employed to great effect in this layout. They are easy to transport, and they surely make closing up for the season a cinch. (But let’s not think about that just yet. . .we’re just getting started!)

See related

Houzz Tour: A Hollywood Writer’s Hillside Studio

While working on the primary residence of a Hollywood actor, author, and producer, Los Angeles architects John Bertram and Eliot Mitchell have been requested to work on another exceptional building at the rear of the property. Located on a beautiful lot supporting Los Angeles’s Griffith Park, the customer wanted to make use of a steep hillside and build a studio for him to write in. The original vision was a crude, rustic cabin — something with a teahouse feel. However, because the design developed, the writer’s studio become a studio and guest house, and also the aesthetic changed considerably.

Due to the epic view, the customer originally wanted to make use of the scenery and install a wall made completely out of windows. That wasn’t the best choice in terms of performance, so Bertram and Mitchell opted to construct a exceptional corner window unit which took advantage of the beautiful view. The result is a construction which uses the perspective because of its inspiration and blends with its environment. The 300-square- foot studio is warm, natural and simply furnished — the ideal escape that is likely to force the customer out of any bouts of writer’s block.

Bertram Architects

The architects had originally done a complete remodel on the customer’s house just down the mountain in the studio. Throughout the renovation process, the customer told Bertram and Mitchell that he really wanted to construct a tiny studio/guest home on the hillside behind his home. A contemporary appearance was a necessity, but Bertram and Mitchell also wanted to give the studio a warm, cabin-like vibe which melded together with the landscape.

Bertram Architects

The studio features an amazing view from three of its four sides. The customer as well as the architects knew that sliding windows which pocket fully into the construction were a must. Mitchell and Bertram wanted to be certain that you use the perspective in a practical and efficient manner, which explains why there is no corner place in this window.

Bertram Architects

“It’s always sort of interesting when an architect needs to convince a customer that a wall of glass might not be the best decision,” says Mitchell. “Even though you don’t need to block any part of the beautiful view, sometimes it’s simply not practical.” Since the construction is an office most of the time, and can be in extremely sunny Los Angeles, having an whole glass facade would have allowed in a lot of light during the day, making it unbearably hot inside.

Bertram Architects

The facade and deck of the studio are produced from Ipe wood, which can be both lasting and fire-resistant — a huge advantage for someone living in fire state.

In one of the chief designs for the studio, the customer wanted the deck to go all of the way around the studio. “It turned into a bit smaller, and then a bit larger,” laughs Mitchell. “Finally, we adjusted it to what it has become, which I think is ideal for the space”

The steep hillside turned into a fairly major challenge. “It was hard to simply receive all the stuff on the website and work on the building due to the steepness and height of the mountain,” says Mitchell. “We needed to really build a strong foundation, which took a while.”

Bertram Architects

Regions of the foundationhad to be hand dug deep into the hill’s bedrock. “It’s just the type of thing which comes with using a home in the Los Angeles hills,” says Mitchell. “You’ve got to realize there’s going to be a lot of foundation work.”

Stone steps (just barely visible in this photograph ) lead up from the principal home to the home on the mountain, and steps made of Ipe travel from a stone landing to the studio’s deck. The desert-like landscaping, designed by Elysian Landscapes, adds to the warmth of their studio and its environment.

Bertram Architects

Teak built-ins and a simple twin bed transform this studio right into a guest home — or somewhere to have a rest if writer’s block strikes. The teak built-in bed and shelving not only adds to the studio’s streamlined aesthetic, but in addition, it functions as a type of earthquake security (another dilemma which comes with living in Southern California). With everything assembled into the walls , there’s no possibility of ruined property or injured individuals after a critical tremor. “Earthquake security is pretty inherent once you’re working in LA,” says Mitchell. “Structural codes demand it, as well as the deep foundation of the studio and the impact wall on the trunk really serve as preventative steps.”

Bertram Architects

A very contemporary half-bath can help to round out this studio because a possible guest home. Bertram and Mitchell used a Duravit Starck two Toilet, and fixtures from Vola. A neon orange panel livens up the toilet with a surprising splash of colour.

Bertram Architects

Zoning laws dictated that the studio couldn’t have a complete bath, so Bertram and Mitchell resisted the indoor half-bath with an outdoor bathtub from Boffi. The secluded nature of the studio and its own exterior deck, together with the balmy weather of Los Angeles, made an outdoor shower a natural match.

Bertram Architects

For the outside, Bertram and Mitchell tried something fresh and installed a rain screen method. The outer facade includes a 1/4-inch space between each plank, making it permeable. The Ipe wood will expand and contract together with the fluctuations in weather and dampness, so the boards were placed on a clip system which allows them to move. The air circulation makes for a much healthier wood and aids the building stay cooler.

Bertram Architects

Besides working with the website’s incline of the website, the corner window unit was the key challenge. Due to its delicate structure, everything had to be perfect. The framework on the outside of the window is made of aluminum, and has a gutter underneath to capture any runoff water from the window. The interior includes a teak frame with a roll-down colour and light on the lip above the desk. “It was a really careful structure,” says Mitchell. “It involved a great deal of work, and a great deal of assistance in the builders and the contractors. The collaboration on that aspect was fantastic.”

Bertram Architects

The sliding structure of the window allows it to start completely, together with the glass sliding into a pocket within the building itself. “This window is one of these classic, contemporary details that looks really straightforward, but is incredibly complicated,” says Mitchell. “We needed to go back and forth with the builder on the how-to for quite a while.”

Bertram Architects

The construction of the window and built in desk is meant to allow the view to continue on into the room and become a fixture at the studio. “People have a tendency to gravitate towards views like this,” says Mitchell. “Whether it’s a body of water or a mountain range, looking at something amazing like that becomes a source of inspiration and quietude.”

Throughout construction, a great deal of things were flipped, and whole concepts were scrapped. “It was really a fantastic luxury,” explains Mitchell. “It’s great to truly be able to suss it out together with the customer. You don’t always have the time or capability to figure out all the details, redesign and make it work.”

Bertram Architects

The teak built-ins, shown here prior to the customer moved in, were designed to blend in the rest of the interior simply, smoothly, and efficiently. In the beginning, the customer wanted to possess the studio accomplished in a wealthy American black walnut, since that is what he has in his principal residence. Eventually he and the architects decided this studio ought to be done at a really different tone from the main home, taking the project in another direction entirely.

Bertram Architects

A conscientious design, an ability to be flexible, plus a smooth transition between the indoors and outside all combined to create a structure that is beautiful, powerful, and efficient. “Seeing the distance come together and emerge successfully at the end is always the best part,” says Mitchell. “All the parties involved in this collaboration were really uplifting. And the customer uses this studio all the time — that can be incredibly satisfying.”

More: Gorgeous, Surprising Corner Windows

See related