No Neutral Ground? Why the Color Camps Are So Opinionated

We ers are extremely opinionated. And it seems like no additional topic brings our views into the surface as far as color. Photos on the two ends of this spectrum — with a lot of neutrals or a great deal of color — always appear to find an instant, powerful response. But why?

At a recent survey on , 44% of ers said they enjoyed neutrals, 15 percent said they enjoyed lots of bold color and 41 percent said that they enjoyed both. As the survey shows, many people do say they enjoy the two neutrals and color, but most people still have strong feelings about the subject.

“Neutrals consistently feel secure to individuals, as indeed they are,” says Leatrice Eiseman, executive director of the Pantone Color Institute. “Shade does not act,” adds James Martin, president of Color People. “You can not ever rely on it to do what you want.” The split personality of these two color camps certainly has something to do with colour tastes, but is this a hot-button topic?

Canon & Dean

A Passion for Color

Among the rest of the controversial topics on , why do so one continually rise to the surface? “Shade is so intrinsic to our lives,” states Leslie Harrington, executive director of The Color Association of the United States. “Every waking — and sometimes sleeping — minute, you’re interacting with color.” The fact that the majority of people have an intimate relationship with color makes it an easy topic to have an impression on — especially when the choices (neutrals and bold colors) are polar opposites.

1800Lighting

Color also tends to instantly stick out in today’s designs. Many insides today have a transitional design which could be difficult to peg or may appeal to many distinct tastes. Shade is completely distinct and warrants an impression right off the bat. “You can not always recognize a fashion as readily as you can identify the color,” says interior designer Jeff Culbertson.

4 hot color trends to play with

Ashley Campbell Interior Design

Social Influences

But our view is not completely our own. “We’re kind of taught that understated is tasteful and overstated is not,” states Martin. “I think a great deal of people genuinely like color but have questions about how it’s going to be perceived.”

Mark Woodman, president of the Color Marketing Group, agrees. “What people appear to fear the most is other people’s negative opinions,” he states.

Sheila Rich Interiors

Negative but misinformed experiences with colors — bold or neutral — may have an effect as well. For those who tend to stick to neutrals, including a big pop of color somewhere random probably won’t feel appropriate. “You may believe you just made a shade mistake,” says Harrington. “However, you didn’t. Live with it and add more color.”

Vanni Archive/Architectural Photography

Neutralizing Neutrals

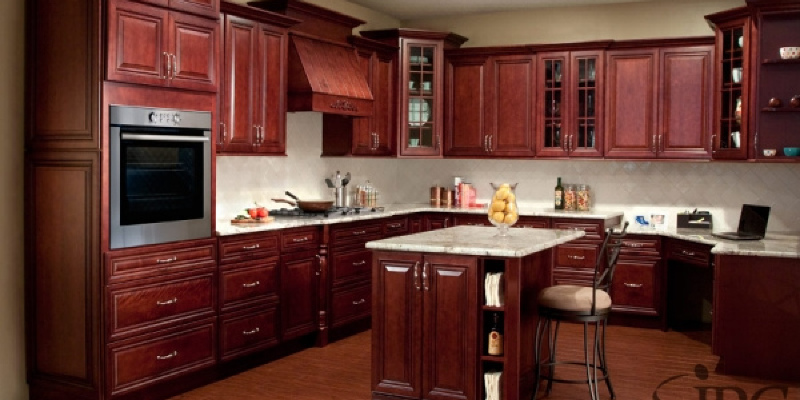
There’s a reason most men and women prefer neutrals inside their houses: They are usually easier to live with. Neutrals “are the perennials of color — not subject to trends as far as brighter colors, classic and dependable,” says Eiseman.

The dependable side of neutrals makes it a safe alternative for big-budget items like couches and much more durable material options — particularly for those who can not make up their heads. Color tends to be a big commitment that wants a great deal of confidence, so neutrals work well for men and women that want to modify their accent colors regularly. “Color is not for everyone,” says interior designer Ellinor Ellefson.

4 New Neutrals for the New Year

Marie Burgos Design

Controversial Colors

“Sometimes people are afraid of color since they can not visualize it,” says interior designer Marlene Wangenheim. Envisioning a bold purple onto your walls could be difficult when your home is all white and gray. So often those who do chose color already have quite a bit of experience with it. Color tends to get better with use and expertise. “The more color you’ve got, the more color you can use with it,” states Martin. “With monochromatic rooms, you will discover there is only a very slim margin for error when selecting a color or even neutrals to go with it. With color, you become free.”

Rikki Snyder

Considering color but feeling anxious? Start small. “Area size occasionally has an effect on committing to a strong color,” says Harrington. “We tend to shy away from large regions of color, even if it’s easy to change or not as expensive to do.” Try using color in a little area which you don’t use that often — like a powder room or even the inside of a cupboard. “This is a jumping-off stage for braver efforts in different rooms,” says Woodman. Or find a color you prefer and tone down its intensity by requesting the local paint shop to add a grey, suggests Wangenheim. This will make it both a color and a neutral.

“Can it be feasible for color to go awry? Certainly,” says Woodman. “I like to believe, however, that there is no wrong color, just color used wrong.”

Next: What to do if you live with a colorphobe | Vote: Color vs. Neutrals

More help from the resource library:
guides to using neutrals
guides to using bold colors

See related

9 Kitchen Cabinet Accessories for Universal Design

Even in the event that you don’t have the luxury of gutting and remodeling your kitchen, it is possible to nonetheless up its efficiency and accessibility quotient. Retrofitting some or all of your cabinets with these accessories will help those in your house get access to what they need and will help your kitchen stay arranged as a bonus.

CliqStudios Cabinets

Roll-Out Trays Storage | CliqStudios.com

Rollout shelves are a great solution for base cabinets. They come in a huge array of sizes and styles and substances. A base cabinet with a standard door can usually accommodate three shelves, based on what you need to shop. If you have larger items to be stored, you can usually fit just two rollouts.

Rev-A-Shelf

Base Cabinet Swing-Out Pantry System

This cabinet system provides ultimate accessibility and organization to get base cabinets. They come as a dual pantry system, such as this one, or as one cabinet system to get one door base cabinet. Here it is in action.

Hayneedle

Rev-a-Shelf Door Storage Trays, Set of 2 – $25.99

Something as straightforward as door storage fittings may facilitate bending and reaching.

Cornerstone – A Division of Richelieu

Wood Classics Door-Mount Rack With Cutting Board

This traditional door-mounted rack system may hold items aside from just a cutting board. Cookie sheets and dish-drain trays come to head.

Richelieu

Maxi Waste Bin

A simple door garbage bin which swings out toward you when you open the doorway helps include messes.

Rev-A-Shelf

Dual Electric Assist Waste Containers

Both of these waste containersare made for base cabinets, are great for smaller families. 1 container may hold waste, and another can hold recycling. The unit may also be combined with an automated opening system for extra efficiency. This is a great system for those with dexterity or mobility issues.

Richelieu

Swiveling Basket

This swiveling system functions nicely in upper cabinets. It gives accessibility, flexibility and organization by bringing items nearer.

Richelieu

This pullout version also works nicely for upper cabinets.

Rev-A-Shelf

A two-tier pull-down system such as this allows you to access those sometimes hard-to-reach upper cabinets. This version from Rev-A-Shelf features a gas-assisted mechanism which produces lifting and lowering the machine simple. It’s a fantastic idea for shorter people and people in wheelchairs.

LKID

When doors on cabinets aren’t convenient, think about removing them for ultimate accessibility. Organization is the trick to making this appearance work so that it doesn’t look cluttered. But since you’re saving money by not performing a entire kitchen remodel, you can splurge on pretty dishware. An arrangement such as this is pretty, practical and entirely on trend.

8 Suggestions to Immaculate Open Shelving

Resolution: 4 Architecture

Here an island becomes the dishware storage station.

Gut Gut

If you’re tight on space, cabinet doors are much more problematic. This kitchen incorporates one complete wall of shelving for everyday items. Shelving doesn’t have to be much deeper than 12 or 13 inches to accommodate regular items. Without any doors on the cabinetry, the distance feels bigger and would better accomodate a individual with a walker or in a wheelchair.

More: Additional suggestions for accessible cabinet fittings

See related

Deck Your Containers With Holiday Cheer in an Hour

If you don’t live in a climate that is mild, chances are that your container gardens look somewhat drab during the winter months. Rather than emptying your pots and hoping to get an early spring, then make a holiday arrangement that can add a little bit of cheer through the dreariest of weeks. Employing natural winter branches and greens, you can create a playful splash of green in an otherwise empty container.

Follow this easy guide to creating an arrangement that’ll last through the holidays.

Kim Gamel

Materials:

A container with dirt
Several evergreen boughs of varying heights
A few decorative branches and accents, such as pinecones, feathery grass and berries

Kim Gamel

Pick a container. You are able to use one that held your summer or autumn agreements. Rather than pulling out the plants and dirt, cut the tops of these plants in the soil line, maintaining the dirt and roots intact. These can help to maintain the greens stable. I’m going to maintain the Dorotheanthus (a yearly from summer) that is trailing over the borders here, since it looks good. If it expires with a future frost, I will just trim it away.

Kim Gamel

Add greenery. Several kinds of evergreen branches can make an enduring arrangement; walnut, spruce, hemlock, holly and cedar are all excellent choices. You can use as much as you like for variety and texture. With this arrangement, I’m using a mixture of white pine, with its short and spiky needles, and Port Orford cedar, which has shiny green, feather-like branches.

Kim Gamel

Start with the largest limbs. These are the foundation for the arrangement. Add one branch in the center toward the back of the kettle, sticking it down into the soil to keep it steady. Subsequently add branches on both sides, arching outward. Continue incorporating shorter branches round the perimeter of the kettle. Fill in any empty spaces with crisscrossing branches, continuing to arch them outward.

Kim Gamel

Add height and play with branches. If you happen to have a redtwig dogwood or curly willow in your backyard already, consider yourself blessed. Trim a few inconspicuous branches and you are all set. If not, many nurseries, crafts shops and even grocery stores carry cosmetic branches, either in their natural condition or painted for your vacations.

With this container I’m likely to stick with a couple of dogwood branches. Their reddish color will last through winter. How many you’ll need will be based on the size of your pot. Start with a small odd amount — say, five or three — and add more if desired.

Kim Gamel

Create interest with accents. Juniper berries, winterberry, crabapples and fountain grass can spice up an arrangement. I’m utilizing blue-berried juniper and yellow-tipped incense cedar for a festive winter look that doesn’t read also Christmas-y. Alternatively, the red fruits of winterberry and crabapple would offer a nice merry touch.

For a focal point, I’m using a large sugar pine cone, but a bow or small wrapped present could also add some glitz.

Kim Gamel

Put in a finishing touch. I’m including a few branches tipped with LED lights for illumination at night. These indoor-outdoor lights need an outlet, but you can find battery-operated alternatives online.

And there you have it! With only a couple of components and about a half an hour, you can make a warm, inviting entryway to your guests all winter.

Show us Please discuss your holiday container tips and photos below!

More: Create a Mini Christmas Tree in a Pot

See related

Splashy Colors Spark a Contemporary Guesthouse

This play- and – guesthouse in Arizona works difficult for the entire family. It’s a space where children run around at full throttle, where their parents frequently amuse and where guests sleeping on weekends. “The entire family needed a space that felt fuss free, fun and totally accessible to people of all ages,” says designer Valerie Borden. However, before she could proceed with the last design, she desired the family to trust her instincts when it came into her color options for the 600-square-foot space.

“Many people feel they’ll soon tire of solid colours or strong colors affect the resale value of a house. According to my experience, this could not be farther from the truth. After seeing how the strong colours made the house feel more inviting in addition to helping it stand out from the rest of the package, my clients embraced the solid colours of the space and could not be happier with our choices,” says Borden.

in a Glance
Who performs here: A couple, their 3 children and sleepover guests
Location: Scottsdale, Arizona
Size: 600 square feet

Chimera Interior Design

The play- and guesthouse includes bath, kitchenette, dining space, a TV area and loft. Walls, cabinetry and furnishings in white and light gray provide a neutral foundation for bright, colorful splashes and patterns.

“We went with a palette of teal, orange and lime green, which the clients feel really uplifted the distance. You feel this jolt of energy once you input,” says Borden.

Dining table: custom, Chimera Interior Design; chairs: Overstock.com

Chimera Interior Design

Borden maximized the distance by placing the sleeping loft directly over the toilet and closet (marked with the orange window doors). “This is a new structure, so we designed the space to match their needs entirely,” she states.

The loft is 5 feet wide by 24 feet long. Three sleeping mats fill it, together with a shaggy rug, lots of cushions and reading lights. “It was actually the customer who had the idea to produce the loft, in addition to the fire pole,” says Borden.

Interior paint: Cool December, Dunn Edwards; cabinets: Ikea; sectional: client’s own

Chimera Interior Design

A Kaiser Tile backsplash and a light fixture which casts geometric shadows on the ceiling add visual interest into the kitchen. A concrete counter tops and Ikea cabinets stand up to the wear and tear of both kids and guests. The upper cabinet on the left hides a microwave.

Chimera Interior Design

The layout of the bathroom inspired. “We knew we wanted a psychedelic effect for this little space,” says Borden, who spent hours on hours sourcing the perfect treatment for those walls. “We originally discussed a tiled wall, but it would’ve killed our funding. This wallpaper adds so much drama to the distance without crippling our funding.”

Chimera Interior Design

An Ikea dressing table and mirror, and wall sconces found at the clearance aisle of Lamps Plus, play a supportive role into the high drama of the wallpaper while giving the distance a clean, modern feel.

Chimera Interior Design

Semifrosted glass connects the shower into the outdoor place. Orange and white tiles out of Sicis provide this pool shower a beautiful sheen.

Chimera Interior Design

The designer cut down costs and gave the children ownership of the space with them paint the artwork in the markets using the teal, orange and green color palette. “They shot a few classes at a local art studio and voilà — our Pollock-inspired masterpieces came into existence,” says Borden.

Chimera Interior Design

A peacock feather pattern plays up cushions and a rug from International Views. “My customer absolutely loves peacocks and literally jumped for joy when I discovered them,” the designer says.

The orange doors behind the sofa and dining table open into an adjoining garage workshop, in which the clients work on creative projects.

Chimera Interior Design

Borden used diamond plate on the door’s workshop side, making cleanup easier when the clients get cluttered in their creative space.

“We are working on the rest of this Southwest modern house’s redesign. We are transitioning outside the Southwest and leaning more modern,” says Borden.

See related

Berm

A berm is a mounded or shaped planting feature of a landscape. Berms tend to be curved and are raised from 18 to 24 inches high. They are sometimes placed to add visual interest, to cause proper drainage or to conceal unsightly elements.

Debora carl landscape design

Berms add visual interest and are a handy way to plant species that have similar sunshine and water requirements. There are unlimited design possibilities for a berm.

Jennifer Jamgochian / Multiflora

Berms and island bedrooms are extremely similar, and frequently the terms are used interchangeably. Island beds normally stand alone, nevertheless, whereas a berm can be a more natural part of the landscape. This is a good illustration of an island bed.

LLC, Company & Woodburn Landscape Architecture

Berms can also be described as the strips of lawn with a street, or the flat areas flanking a tube.

Christopher Yates Landscape Architecture

Not all berms have to be flower beds; ornamental grasses planted to a large sloping mound are a modern solution to the berm.

See related

Look Up to the Attic for a Playful Kids' Bedroom

A kids’ bedroom is a sacred area — it’s among the few areas they could truly call their own, and yet one place they can rely on to get a little solitude in. However, the latter isn’t always a simple thing to achieve, especially in huge households. If your children feel somewhat vulnerable, consider altering your loft space into a distinctive bedroom just for them. A getaway on the floor can make the ideal escape, providing them the space they crave — and making more quiet for you downstairs! Read the professional tips below to initiate the transformation.

Beinfield Architecture PC

Balance brights and whites. You desire the space to feel fresh and lively, not claustrophobic. “Save colour and patterns for the floor or walls, and maintain your ceiling bright and light,” says designer Laura Umansky. “Since the ceiling is often low in attics, leaving them helps to make the space feel bigger.”

Warm with texture. Kids’ rooms could be lively spaces, so have fun exploring with patterns. “Fun patterns and textures can add a lot to a space,” states Umansky. The rainbow-colored rug in this spirited loft bedroom features a polka dot two-tone pattern on the wall.

Laura U, Inc..

Dress your windows. “Do not shy away from incorporating drapery into a dormer simply because your ceilings pitch at either side,” states Umanksy. “Window treatments add both texture and drama to a room.”

Kelly Donovan

Go low. Short furniture pulls double duty in a children’ loft bedroom with balancing the scale of sloped ceilings and producing perfectly sized spaces for smaller children.

Harry Braswell Inc..

Transform sloped ceilings into storage solutions. Do not worry about a sloped ceiling operate with this embarrassing layout to make the most of your child’s storage area. “Pitched ceilings make certain parts of the room uncommon, as you can’t stand up, so use them for storage rather,” states Umansky. This area’s built-in shelving transforms the place under a catchy ceiling into functional space.

Kelly Donovan

Get creative with sloped ceilings. If a built-in or large-scale shelving unit is too big for your room or out of your budget, it is still possible to add additional function simply by hanging a hooks or rack under a sloped ceiling. A small mirror below turns this place into a tiny dressing room.

Soorikian Architecture

Produce a sleeping nook. A sleeping nook can help you take advantage of awkward loft corners. This slanted ceiling feels supercozy, making this exceptional space additional comfortable.

Read more children’ spaces

See related

5 Glorious Shrubs

Are you discovering your landscape lacking as the dog days of summer give way to fall? With this late-summer twilight zone putting in, are you currently wondering whether there’s anything more which will bloom or bear fruit before it’s all mums and pumpkins? Fear not! Listed below are five uncommon shrubs that wait patiently the last minute to actually do their thing. Shop for them in autumn, while they are in bloom, when autumn rains can help new plants settle in.

You may know it as bluebeard or even blue spirea, but if you are a lover of blue and do not grow Caryopteris x clandonensis (zones 5/6 to 9), you are missing out. Easy to grow in sun or light shade, varieties of this shrub bloom late in a palette of cool blues — a mouthwatering counterpoint to autumn’s warm tones. Chop it down in late winter and it’ll remain a clean 3 feet high.

Find your climate zone

Why is it always see recommendations for bush clover (Lespedeza thunbergii cultivars, zones 4 to 8) in books and magazines, and it’s still so underused?

A true parking lot plant, this one develops anywhere in sun or light shade, and blooms in jewel-tone pinks or whites that are crisp. Like Caryopteris, it could be kept tidy by clipping it to the ground in late winter — unlike this plant, it is going to grow 4 to 5 feet tall in 1 season. It drapes and makes a fantastic cascading accent in bloom on slopes and walls, narrowed down by masses of flowers.

Photo courtesy of Wikimedia Commons user BotBln

If I had to select a single uncommon plant I recommend many, it would be seven son flower (Heptacodium miconioides, zones 5 to 9). This shrub or small tree is often likened to southern crape myrtle, but frankly I like it.

Assets include: crisp, textural dark green foliage all season which turns to gold in autumn; peeling white bark year-round; and, most important, fragrant white flowers as summer turns to fall, followed closely by red-purple fruits (shown here) which are at least as pretty as the flowers. Seven son flower will grow 15 to 20 feet tall and 8 to 10 feet wide, but it’s easily pruned to a more compact size.

Photo courtesy of Wikimedia Commons user VoDeTan2

I make no bones about the fact that I enjoy plants which form colonies, and harlequin glory bower (Clerodendron trichotomum, zones 5/6 to 10) is one of my favorites. This shrub is glorious for several reasons, the most prominent being its deliciously fragrant jasmine-scented white-over-magenta flowers so late in the summer that provide way to gorgeously weird fruit such as bright blue BBs, also framed by a magenta mantle.

Give glory blower room (about 10 feet) to spread out, and you will be rewarded with a 10- to 15-foot-tall colony punctually — briefer in colder zones, where it could die back to the ground in winter. Bonus: its own leaves smell like peanut butter.

Photo courtesy of Wikimedia Commons user Jean-Pol Grandmont

If it’s berries you are after, you’d be hard pressed to do better than beauty berry (Callicarpa species and cultivars, zones 5/6 to 8). This beauty’s shiny, purplish fruit doesn’t come into its own until September, and it hangs around after the leaves have fallen. Give it sun and plant multiples for best fruiting. Beauty berry grows to 6 feet tall and broad, and in zone 5, in which it may die back, it may be pruned hard to approximately 6 inches above the ground in late winter. A bit of late winter pruning is a good idea in all zones, because beauty berry flowers and fruits on new wood.

Photo courtesy of Wikimedia Commons user Sten

See related

Bring Home Buyers Easily With Great Photography

One of the most effective tools you have when marketing your home for sale is amazing listing photography. No matter how fabulous your house is, it won’t sell if the listing photos don’t do their job. Your photos should be bright, light and welcoming so potential buyers jump ahead and schedule a showing. Below are some simple ways to get the most out of those incredibly important home photos.

Brian Watford Interiors

From the listing, include only photos of your most attractive rooms. Include the description and dimensions of the other chambers in the house, but you’re not doing yourself any favors from adding poor photos or staged rooms. Lure potential customers in with lovely spaces; don’t show them anything that may stop them from scheduling a showing.

Grainda Builders, Inc..

Your photos should concentrate on the architecture of the home rather than the decor. The shot taken of this living area captures both the architecture (the paneled fireplace and the bookcases) and the view from the big windows. The sailboat over the mantel brings buyers’ eyes into the focal point of the room — the fireplace. When I had been gearing this room for property photography, the one thing I would add here could be some cushions in on-trend colours and patterns to make the conversation place more welcoming.

Architects, Webber + Studio

Taking photos from the far corners of chambers and low to the ground gets more flooring to the photograph. The more flooring you see, the bigger the room will appear. Removing all rugs from a distance adds square footage — at least in a buyer’s mind. Unbroken floor area makes any room appear bigger, and square footage is king.

Martha O’Hara Interiors

Take photos at one time of day when you have the best natural lighting in the main rooms of the home, like the living area, the kitchen and the master bedroom. Ensure you open every window covering as well as doors to allow more light in. Don’t use a flash if you don’t have to — it’ll distort colours and appear unpleasant.

Jennifer Bevan Interiors

Although most interior photos in magazines are taken with all the lights off, it is typically best to turn all lights for record photos. Meaning every overhead, kettle lamp and light in the room. Those stains of light draw your attention to every corner of the distance, so a purchaser may linger somewhat more on the photograph.

Abbott Moon

Light a fire in the fireplace to create a sense of closeness and hominess. Notice how light is streaming in from the left side of the room? As I mentioned earlier, be sure to open all the windows and doors to allow in lighting so a comfy room like this will not appear dark. For a record photograph, I would also remove the carpet to make the room appear bigger.

BraytonHughes Design Studios

Think about taking a few unconventional photos rather than just the old shoot-from-the-entry standards. Open the French doors, throw open a window or move the chairs out from the dining table to make a photograph that entices and catches the imagination of a prospective buyer.

Taste Design Inc

It is pretty standard to have a photo from the front door to the entrance, right? But try taking a shot of the entrance from the inside toward the front door and open the door, as in this photo. It is much more interesting and may be a better vantage point.

I would really like to hear your own tips for creating great photos for property listings. How can you take photos when selling your home? What is your opinion on the usage of a fish-eye lens for this kind of photography?

See related

1960s Ranch Redo at Denver

At first, a sister and brother couldn’t envision how to upgrade their inherited childhood home. However, by the time that this whole-house renovation was complete, they understood they needed to sell it to prevent a feud over who got to reside there.

The house sat in a fantastic location with a big, lovely backyard but the siblings’ attempts to receive it sale ready (new paint, new carpeting) were insufficient. “If you strike the proper areas and work creatively within a budget, frequently you can double your investment,” says designer and general contractor Jonas DiCaprio of Design Platform, an architecture and construction company. In this case, the house was worth $240,000 before the renovations, the renovations totaled between $70,000-$80,000, and the house sold for $370,000.

in a Glance:
Who lives here: New owners. During the renovations, the house was owned by a sister and brother who inherited their childhood home from their parents and wanted to make it ready to sell.
Location: Southeast of downtown Denver, Colorado, in the Bible Park neighborhood
Size: 2,639 square feet; five bedrooms; three baths
Scope of this job: Complete house, such as gutting the kitchen and baths, including hardwood flooring, opening the floor plan, decorative changes to all the bedrooms and changing a cellar workshop to a rec room.
Year Built: 1967

Design Platform

“The house had a whole lot of nasty maroon and green onto the facade,” says DiCaprio. “We needed to work together with all the brown roof and gold brown brick, so we went with an easy black and white palette.” The architects also included a bright orange doorway to grab attention, and also added the decorative cement border to expand the very narrow driveway.

Before Photo

BEFORE: Indoors, a entrance cupboard cut the living space away from the dining room, creating chopped-up, dark spaces.

Design Platform

AFTER: The painters removed the cupboard, moved the kitchen in the former dining room space and added a massive beam. Now natural light spreads from one side of the house to another.

Design Platform

The designers stored money in the kitchen intestine renovation using black Ikea cabinets and then adding custom details. “Ikea cabinets are great quality and they cost about a third of the purchase price of custom or semicustom cabinets,” says DiCaprio. “While you can’t refinish them you may just replace the fronts should you ever need a change.” They swapped in higher-end modern Sugatsune handles and pulls.

The wall-mounted cabinet to the best of this stove can be from Ikea. “It is shallower than a standard cabinet, so it does not affect the window,” says DiCaprio. The backsplash works up into the base of the cabinet, reflecting the light.

Glazed ceramic tile in architectural grey: Daltile

Design Platform

The designers dressed the cabinets by adding rift white oak details, wrap the ends of the pantry, cabinets and island in the timber, in addition to creating a custom rift white oak refrigerator surround.

Before Photo

BEFORE: This earlier shot was taken at approximately the exact same angle as the previous picture. The former dining room was transformed into a part of the spacious kitchen. Look to the far left and you will see the fireplace shown in the next picture.

Before Photo

BEFORE: DiCaprio moved the dining room in order to make the most of this fireplace — well, this fireplace using a really dramatic makeover, since this one is not very appetizing.

Design Platform

AFTER: The brand new dining room takes advantage of this previously obsolete fireplace, which failed a significant facelift.

Design Platform

“We covered the instant present encircle in black grill paint that is fire-resistant,” says DiCaprio. “We then covered the facade in El Dorado stone, which is a veneer. We finished it by trimming out it in rift white oak, which we also used in the kitchen.

“We also used 4-inch rift white oak on the flooring,” he adds. “Oak is a frequent ranch aspect, but generally red oak. We chose rift white oak to freshen up things; it casts more brown tones instead of the typical ranch red.”

Design Platform

DiCaprio knocked down more walls and created an open floor plan. The dining room and kitchen open to one another, which divides up everything and allows the person cooking trip with relatives and guests.

Before Photo

BEFORE: The guest bath and its own salmon-colored countertop were, quite frankly, depressing. “I don’t know why the majority of these ranches have these built in soffits using all the awful lights,” says DiCaprio. The room had a grim tub, which he was able to reglaze and keep for only $300. “It might have cost at least $800 to replace the bathtub with a poor quality fiberglass bathtub,” he states.

Design Platform

AFTER: “By incorporating subway tile from floor to ceiling, we brightened up the space,” says DiCaprio. The dressing table is from Ikea; DiCaprio splurged on the custom-built medicine cabinet.

Before Photo

BEFORE: From the master bath, this shower/commode configuration was less than perfect.

Design Platform

AFTER: DiCaprio made a tiny space from another room to enlarge this bathroom. This allowed for a lengthy, curbless open shower which does not require a shower door. Using glass leaves the room look much bigger.

Hint: Placing the faucet handle away from the showerhead, as you see here, makes it effortless to switch it on without getting blasted by cold water.

“It is funny, we get some jobs where the sky is the limit in terms of budget, but somehow functioning within a budget can ignite more creativity,” says DiCaprio.

More:
Rejuvenated Ranch
Cozy and Family-Friendly Space

See related

12 Ways to Cool Your House Without Air Conditioning

Summer heat waves have everyone looking to cool. Blasting the air conditioner isn’t necessarily a choice, and it certainly uses a lot of energy. Instead of shelling out the big dollars to stay cool, think about several alteratives that can make a difference.

Eileen Kathryn Boyd Interiors

1. Choose light-colored blinds. Installing window blinds or shades is a no-brainer. But light-colored colors tend to be more effective, since they reflect the heat back outside. Close south- and – west-facing drapes during the day.

Consider applying window tint too. “You don’t have any idea how amazing the brand new 3M window film products are — not only for reducing heat, but also for cutting down on the UV variable that can fade your carpeting and substances,” says window designer and expert Cory Jacoby of this Jacoby Company. “This should be your first line of defense.”

2. Use liners with your colors. Bamboo or closely woven shades are just another good way to cut heat. “The trick here is to set up an operational liner as well that can be dragged down for sun and heat control,” says Jacoby. “This is truly the best of both worlds, since you see outside through the weave when you want, then lower the shade behind it for sun protection when necessary.”

Rachel Greathouse

3. Install ceiling fans. “Ceiling fans can make a room feel much cooler, since they circulate the air. And considering they can cost as low as $100, they’re often a investment that’s not only affordable but easy,” says general contractor LuAnn Fabian.

ARCHIA HOMES

4. Open the windows during the night. Ventilate your home on cooler days or during the night time to reduce any hot air that’s snuck inside. Open windows in all rooms of the house and place window lovers facing the downwind side of your home. Make certain all interior doors are open to keep the atmosphere.

Terra Ferma Landscapes

5. Plant shade trees. Exercise your green thumb by planting shade trees around the house. Design partner Andrew Spiering, previously of Terra Ferma Landscapes suggests casting shadows on the southwestern exposure of the home using large deciduous trees, such as oaks, sycamores and elms. “Other ideas include increasing humidity around the home using layered planting or reducing hardscape,” he says.

Liquidscapes

6. Allow ivy to crawl up the walls. Ivy provides a buffer between your home and the sun. “Planting a green wall or vines in your home reduces dependence and absorbs heat,” says Spiering.

Exteriors From Chad Robert

7. Cover the south side of your home. Install awnings on south-facing windows to compensate for insufficient roof overhang and provide extra colour in the summertime.

8. Turn off the TV. Maintain heat-generating appliances, like lamps and televisions away or off from your air-conditioning unit or thermostat. The device works harder to respond to nearby heat, believing your home is hotter than it truly is.

Holly Marder

9. Get a hood fan. In case you don’t have a range enthusiast in the kitchen, think about the investment. Cooking can generate considerable heat throughout the house, and a range fan can help considerably with venting that hot air outside.

jessop architects

10. Replace your lightbulbs. Replace incandescent bulbs with compact fluorescents — based on Fabian, CFLs can emit up to 75 percent less heat.

NAUTILUS Architects

11. Paint your roofing white. A white roof can help to reflect heat away from your home and help maintain the loft — one of the hardest places to cool — as low in temperature as you can.

12. Update your insulation. Many newer houses must follow certain depth codes for insulation, but older layouts may require an upgrade. “Replacing insulation in older houses will definitely reduce the heat inside,” says Fabian.

More: Cool Architecture for Hot Summers

See related